Hi Shawn Classroom #1 for OSL... TAB

vincegamer

New member
I have an urgent question

Shawn,
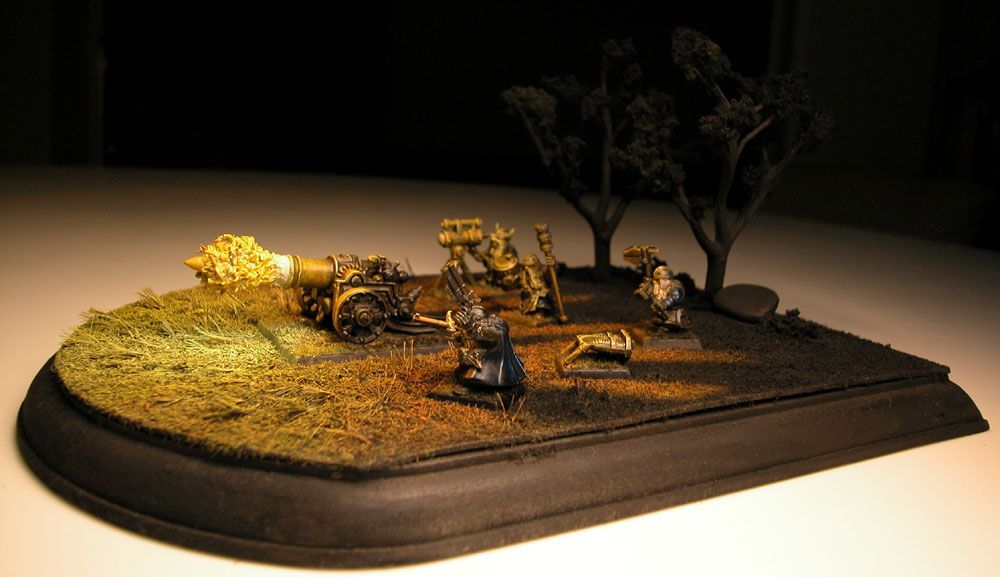
I\'ve been looking at your steam machines lately, and I want to know how you made the emissions from the pipes.
It looks great and would be a great light source for a mini I\'m working on. Can you tell me how you did it? Please?
 

Shawn R. L.

New member
It can seem daunting but it\'s a simple thing done over and over. Get a piece of white foam rubber with a fine \'grain\' (the little holes are as small as you can find). Decide how big you want the smoke to be. With a small, sharp pair of scissors cut/trim the whole thing to the OVERALL shape you want it to be. Some sort of teardrop shape usually works good - the pointy end going in the smokestack. You\'re working from large to small.

What this is an exercise in is making a glob of different size balls randomly spaced.

First, the overall shape.

Secound, cut some randomness into it - holes,valleys, leave some high areas.

Third, each of the high and low spots, further \'randomise\' with smaller valleys, holes, high spots.

Fourth, now begin to refine the lump\'s into balls. Dont cut them loose, just round the outside.


Painting.

Keep the paint rather thin.
Take the smoke and put some yellow on it then put it into your hand and squeeze it to get the paint to go all the way through and, most importantly to get rid of any glob\'s of paint.

Use a stiff brush and scrub the colors in - VERY IMPORTANT. You want to tint the foam rubber, not put paint on top of it. Too thick of paint simply looks like cake frosting ON the smoke not color OF the smoke.

Going from light to dark, inside to out. Shade each ball with orange - red - brown - black, in that order orange being near the inside, black on the very outside and more toward\'s the top. Have the balls near the bottom have more orange and less black, the top balls, more black and less orange.

Like I always say, try those things and post WIP\'s.

Here\'s ya some reference material.


oil_well_fire_long.jpg
 

funnymouth

New member
multiple, overlapping light reflections.

hi shawn,
how does one do this? it seems that in the overlap it might come out too bright.
 

TAB Studio

New member
Hi there
Sorry work has been a roller coaster.
here are some teasers I am not happy with the quality but that is my fault my mid is not settled enough to persevere.

Shawncannon4-18.jpg

I will get the individuals soon sorry for the drag in time Shawn
 

Shawn R. L.

New member
@funnymouth - Not sure what you mean. Could you reword or something?

@tracy - Now THAT is really starting to work well. I have a few pointers but it\'s getting to be sack time here. GOOD work. I\'m glad your hanging in there, this is fun for me.
 

funnymouth

New member
i was thinking two fields of light - so two light sources with their fields of reflection overlapping on a surface. think ven diagram with the light source being centered at each of the circles. it seems like the overlap could be trickey (esp with complimenting colors).

i thought you might like to take a look at my latest mini with \"quick and dirty\" osl. im trying to perfect fast osl (i have a lot of skeletons to paint) and i thought you might have some insight in to quickly producing a convincing light source. in fact, any tips at all would be nice :D.
 

Shawn R. L.

New member
@funnymouth - The mini you have done, the skeleton and the toad, I see only one color of light. The blue of the skeleton\'s eyes and the base of the toad\'s sword and crevices of the armor.

The skeleton\'s eyes dont light up for me. He simply looks like he has a blue face. What you need to do is to tone the rest of him back quite a bit. Midtone grey/brown. Highlight with a light grey/brown NOT WHITE. You want the center of the eyes to be pure white and have NO other white on the fig. Try that, post WIP\'s, and questions.

As to multiple, differently colored lightsources, yes it can be done. I have done it BUT it\'s difficult and the results (on mine) were so so. I did a canvas of an elf playing in a Christmas tree with 3-4 differently colored Christmas tree lights. It works - technically but it had a garishness I wasnt happy with.

One way to do it is to paint the mini according to each lightsource, ignoring the other lightsources as you do each color. Then go back and where the colors intersect blend/mix them accordingly. It keeps it simpler that way. As I mentioned with my Christmas tree painting, multiples can be garish so choose your colors carefully. I think one of the problems with that painting (done 15 years ago) was that all the lightsources were the same intensity. You might choose to have one be dominant and the others less so.

As to where the colors intersect you might need to refer to some sort of color chart for photography or a physics representation of the spectrum and intersecting colors of LIGHT. What happens with mixed paint and mixed light are not always the same. All paint colors mixed make muddy black, all light colors mixed make white. Also, where the colors of light intersect, the area will not only be a combination of the two colors but it will also be lighter due to the area recieving twice the light.

Hope that helps. Try some stuff and post some more WIP\'s.
 

funnymouth

New member
hi there shawn, thanks for the prompt reply. as to the mini i just posted: the osl was an afterthought - thats why the mini is hilighted with white.
i hose you didnt think the blue on the toadman was supposed to be osl -ITS NOT! its copper oxidation (metallics are my current area of focus).
42483180_6f6cde4de6_m.jpg

making the osl a similar color was a mistake on my part.

the overlapping thing was an idea that i was playing with. if you had problems though, i think ill hold off until i have a few years of experience with standard stuff first.

thanks for the tips! ill be in soon with a legit and \"serious\" project, instead of a time filler mini.
 

Shawn R. L.

New member
If you really want to try to learn OSL, get a SIMPLE mini that has an obvious object in it to use for a lightsource - an orb, a lantern, fire, etc.... and we can start from the beginning. I would love to go through it with you.
 

Shawn R. L.

New member
@funnymouth - the short awnser is yes, it can be done. I\'m not familiar with your what skill level you are at. This could be a tricky one to start with. I\'m willing to try with this one but if this your first foray into OSL it might be good to start with something simpler till you learn the ropes. I\'ll leave it up to you. I can go either way.
 

Shawn R. L.

New member
@funnymouth. I was just at my local GS and saw a mini that would be perfect for this. And it\'s only 4$.

It\'s Reaper #2007.
 

Shawn R. L.

New member
If you really want a powerful looking muzzle flash, do a google image search on either muzzle flash or M1A1 Abrams. The flash from some of those tank shot\'s are almost as big as the tank itself. What I like in a muzzle flash is a big ball of fire with a much smaller pointy thing projection from the front - a teardrop but with a very exaggerated curve in the area between the ball area and the point. Also have the point be, mabey twice the length of the ball. That gives some velocity to the \'shot\'. Try to have any grooves and such be somewhat sharpedged (except on the gunside of the \'ball\'). If you get too rounded it can look like your firing icecream. I really like how you encluded the small spit\'s from the sides of the muzzle brake.

Here are a few muzzleflashes I have done.


http://www.coolminiornot.com/73346


http://www.coolminiornot.com/78595
 

Shawn R. L.

New member
Tracy. I havent forgotten you. I\'m just at a bit of a loss at the moment. There is so much to what you are doing and not being able to hold it, turn it around, have consistant lighting and the like is making it difficult. Give me a few days and I\'ll get back to you. More photo\'s always help.
 

funnymouth

New member
well i suggested that mini because i have it :D. i think your right though, i should start easy, and she seems like she\'d be tough. better idea, how about you help me with the glowing eyes of my skeletons (sounds easy enough...)? ive already taken your advice and removed any white hilights from the minis themselves.
ill post wips early next week, ok? from these we can move on to something more complex. as far as skill level is concerned i would consider myself to be at the \"intermediate\" level. i will add my gallery to my sig.
thanks, see you in class!
 

Shawn R. L.

New member
@funnymouth. This is what I recommended to mcclimbin and it seemed relevant to what you are doing.


Originally posted by Shawn R. L.
@mcclimbin - At this point, your mini dosent need alot to get the OSL to really shine.

One thing about OSL that is a bit of a trick is to understand tone. Some of the really mind blowing OSL (I\'m thinking of Eric\'s one with the blue fire) are done in pitch black. I have done it and it\'s a very dramatic effect. BUT pitch balck isnt necessarily the only way. There are shades/tone\'s/values of black. I can take a flashlight-torch that\'s a million candle power and turn it on at high noon outside. It IS pumping out alot of light. Because the ambient light is so bright you will get almost NO effect from the flashlight. If you were to aim it at something and take a picture every 30 minuets or so and look at them in sequence you would notice that FAR before total darkness the effect of the light would be visable. Look on a rainy or foggy day. You can see just fine BUT the car headlight\'s show up more and definately glow. That\'s because, while not black, the ambient light has been reduced to the point where the headlamps are putting out more light.

Now, your mini. It appears you have a bright flashlight in noon day sun. You can simply \'push the light\' a little further in the day. Dosent have to be night.

This mini I did this effect on.

http://www.coolminiornot.com/114300

I simply restricted the TONE of my pallete to dull and darker colors than the eye\'s, thus the eyes are now the brightest part of the mini and give the illusion of being lit.

Back to you. Take your mini and do some darkening of the whole mini EXCEPT the actual lightsource and some of the cast light on the fig. Washes would be a simple way to do this and in a matter of a few minuets your mini could glow much more. If you have read much of what I have written in this thread you will hear me, over and over, saying that the ONLY place on the fig where there should be pure white is the actual lightsource and MABEY small dot\'s like the \'gleam\' put on gems.

Try that and post some more WIP\'s.
 

funnymouth

New member
i am having some trouble with red osl coming out pinkish (not nearly menacing enough for the undead). how do i fix this? i have heard adding yellow or orange helps - but wont that make it look orange?
 
M

Marmoset

Guest
Originally posted by darkartminiatures
Hi Shawn. This is all i have done so far. I think i need to add more greenstuff as it doesn\'t look powerful enough. Any suggestions?
Here\'s some lovely muzzle flash and great OSL (the space hulk one). The silver winner has great OSL too :wow: I don\'t know how these were achieved, but experiment, it might be worth a shot! :)

Hope I helped, happy painting and good luck!

~Bill
 
Back To Top
Top