a TITANIC undertaking

fiesta0618

New member
Designs

Well, after a good bit of work I have the general info done, as well as instructions for building the feet. Those are the most complicated part, so if you can do that, you\'re all set. I\'ll carry on digitizing the designs in between building parts...but how should I distribute them?

--Fiesta
 

Paintman Spiff

New member
Looks like the largest scale \"Mini\" that I\'ve ever seen. I suppose the term \"within reason\" no longer applies. lol

The leg chasis looks similiar to Battletech: Clan Smoke Jaguar\'s Vulture & Mad Cat (also were cast from Ral Partha), without the centre toes. Yup, that chasis looks like it can run 24 metres/sec. :D

I\'m curious of how the Torso is gonna turn out. Excellent model.
 

jerry kurl

New member
Fiesta, that is the most amazing build iv seen, i would love a copy of the designs when you get round to them. I would love to have a crack at fashioning my own titan out of plasticard.

Top work it looks lovely :D
 

fiesta0618

New member
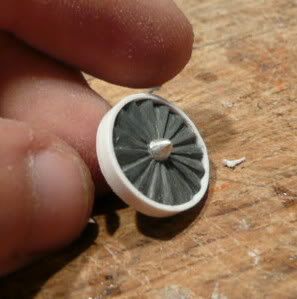
Hey folks, a small update and a question. I\'ve been working on the gun mounts under the shoulder guards, and while some of the joints were drying, I made a little exhaust fan for the Titan\'s back. Here it is:
cmonphotos-1.jpg

When I finished, two things occured to me. One, I do NOT want to repeat this process three more times! Two...it\'s a Thunderhawk engine! I\'ll want it later! Therefore, I say to myself, I should make a mold of it. This leads to my question: Anybody have experience making molds, and have a product to recommend, both for making the mold and making the cast?

--Fiesta
 

DarkStar

New member
Originally posted by fiesta0618
Anybody have experience making molds, and have a product to recommend, both for making the mold and making the cast?

Aye, your best best to avoid the work of doing it 3 times is to go with a quick mold. An easy piece to mold from the looks of it since you\'ll only need to capture detail on side, the back can be flat.

Since you\'re in the US you can go to Michael\'s (hopefully they have one in Boston!) and pick up some of this here for really cheap *around $10 with Sunday newspaper coupon*: http://www.amazingmoldputty.com/

If the employee can\'t find it tell them it\'s by the casting plaster.

Now, once you\'ve got the silicon, you can look at the instructions here: http://www.youtube.com/watch?v=3pMW3pdcsQY&feature=related

And scale down the project size. Also you can follow along with these instructions: http://www.b9robotresource.com/molding1.htm

And just don\'t worry about it being two part. If you get your hands on Amazingmoldputty, then you don\'t have to worry about the pouring phase, just mix and press, it\'s simple as that.

Casting resin can be bought at Michael\'s as well, but I think all they have is the clear liquitex stuff which is very inferior and I would recommend searching elsewhere for the actual resin in your area. Try to look for TAP plastics in your area and go there. If you can\'t find that look for a hobby/model railroad store they usually have some form of casting resin that those modellers use for their terrain projects and such.

Great Titan, very precision work I think with your level of technique you should get a grip of casting small parts in no time, it\'s a great time saver and not expensive when working with such relatively small scale parts. Best of luck!


*found a better vid showing what you\'ll need to do if you get the amazingmold putty. Not the exact same product but same process, I put that in the first link.
 

pyropsyc

New member
Amazing work fiesta0618! Cant wait to see it finished!

Is that Plastic card you are using to construct the bulk of it?
 

jerry kurl

New member
Vallejo do a white liquid putty thats great for filling little holes and joins as it can be brushed in and the lightly sanded or shaved with a sharp knife.

Just thought it may be of some use for your project rather than using liters of superglue to fill the sanding gaps :)
 

goalie4hire

New member
Originally posted by fiesta0618
Well, after a good bit of work I have the general info done, as well as instructions for building the feet. Those are the most complicated part, so if you can do that, you\'re all set. I\'ll carry on digitizing the designs in between building parts...but how should I distribute them?

--Fiesta

I would think that if you are a member of the yahoo group: bwc-archive, that you could just post it there, being it\'s all about files of Warhammer 40K DIY plans... If not, maybe just have people request the info and you can zip it to them in an email? I\'d be happy to do whatever works best for you.

G4H
 

fiesta0618

New member
I reckon emails would be the way to go at this point--I want a measure of control over where this thing ends up. So if anyone wants a look, PM me with your email and I\'ll send it right out.

Also! Dark Star, that looks like one heck of a product! I have the first mold curing as we speak, can\'t wait to see how it works. I found a reputable casting resin at a local Utrecht store, and will likely have my first cast done by tomorrow. I have no idea how long I might have spent or much I might have paid experimenting with slow-setting pastes...I owe you big.

@pyropsych: Yes, it is mostly plasticard. The white is plasticard, dark gray is PVC, light gray are sprue pieces, and the light brown stuff is \"corrugated aluminum\" textured architectural basswood.

@ jerry kurl: I thought of using a filler putty at first, and I\'ve heard that Vallejo\'s is particularly good, but I opted for glue because of the additional strength it affords. I mean, this thing is actually pretty heavy; the legs alone weigh more than half a pound.

@ everyone: Thanks for the encouragement! And keep watching--I have one \"armpit\" (that\'s what I\'m calling the gun mounts :p) just about done, with all the wires and fiddly bits that it should scattered all over. Great fun!

--Fiesta
 

fiesta0618

New member
Yes, I have actually been working

So!! After a good long bit I have some real progress to post. First, a small update: exhaust fan castings. Sorry the picture looks a bit loopy, but I had to do cruel things to the contrast in order to make it visible at all (cursed white-on-white details!)
3355632630_d18f2e82df.jpg


And, more importantly, the first armpit:
3355632592_75a04aa214.jpg

3355632546_a4d449437f.jpg

Fear not, I will not leave the rest of the chassis side blank the way it is, I just haven\'t yet 100% figured out where the edge of the armor plate will be. Also, the armor guard is not CLOSE to finished, I just tacked it in place for show. I do, however, have a question for you all: Should I put some kind of texture (e.g., structural ribs or riveted metal plates) on the underside of the armor plates, such as the shoulder here and the shins as shown before, or is it fine as is? Realistically, these shoulder plates are the only place it matters, but I want to do the thing right. Thanks!

--Fiesta
 

goalie4hire

New member
I wish I could see the pictures, but it says the bandwidth is exceeded for Photobucket. I\'ll try logging in later and voting
 

fiesta0618

New member
Aright, I fixed the photo issue (for the latest ones at least). Frankly, lads and lasses, I\'m honored that so many of you are looking at this that I\'m violating bandwidth limits :). Please continue to follow my work!

--Fiesta
 

CMDante

New member
Since you are going to such incredible lengths to detail this beast I would recommend doing the support structure for the armour. Supporting girders, rivets etc. It will be worth it in the end when you have a better finished model than the FW titan.

Cheers,

Dante
 

jerry kurl

New member
I have to agree with Dante, go for the extra details, itl add to that wow factor when people are dribbling over it (you may want to ensure its varnished for easy wipe :wow:)

I carnt belive how quick your motoring on with this its an awsome build!
 

fiesta0618

New member
All right lads, I caved. I added detail to the inside of the armor plates. I think of the armor as a ceramite shell over a frame of steel plates, and now the inside reflects this. Here\'s the first shin:
3368644682_db2a85d1f9.jpg

3368644318_32442caf5a.jpg

I\'m hoping to leave it with this laminated-joint look, because too much \"stuff\" on the underside could begin to interfere with the attachment points, but please let me know if this is enough. No amount work is too much in this project!

--Fiesta
 

DarkStar

New member
Originally posted by fiesta0618
, but please let me know if this is enough. No amount work is too much in this project!

Well you can always ask yourself what the purpose of the item would be \"in real life\" if it were to exist and start to rule out extra detail if it doesn\'t fit.

Armor plates wouldn\'t have any sort of control panels, no moving parts so no hydraulics. They need to be attached in a manner like you mentioned so have to have clearance for that. The understructure would probably be pretty bare since, they\'re just plates. If they had any sort of \"greebling\" on the surface that would imply they had some kind of mechanical or moving parts underneath for whatever reason, and I don\'t know if that would be a good idea placing parts like that in a structure that will taking much abuse in a battle situation. Much better to house them somewhere that is protected by the plates, and not on the plates themselves.

So, the only kind of detail I can think of other that what you\'ve got here, is superfluous detail such as iconography, battle damage, decay etc...

For iconography, not much of a purpose to display anything like that on the undersides of plating so that\'s not a fit. For battle damage, under the plate is where there would be less, so not much to do down there and decay, same thing, barring the odd dirt accumulation but that can always be done by the painter. trying to think of anything that could be there and not coming up with anything really.

I think personally you\'ve taken the plates to a good level on the insides leaving room for the painter to go deeper with detail if they wish, but not exposing any sort of flaw in the \"realism\" of the item.
 

goalie4hire

New member
Titanic Undertaking

I finally got around to taking pictures of my work. At first I was going to go simple, but as you know... I had to change my mind after seeing yours. This Titan is just going to be practice until I start the one using your plans.
 
Back To Top
Top