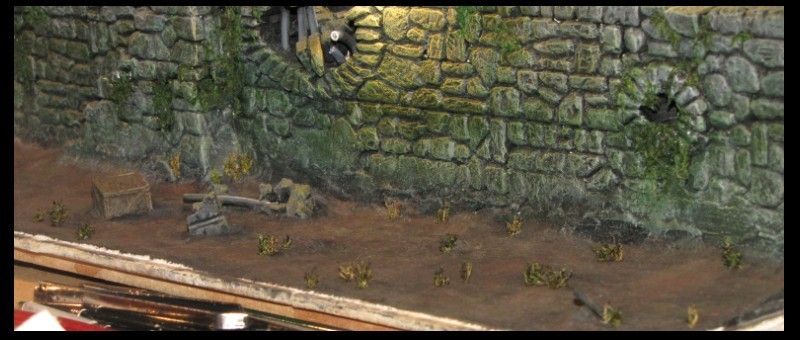
WIP: Ambush in the sewers

DunErwit

New member
Thanks for all your comments :)

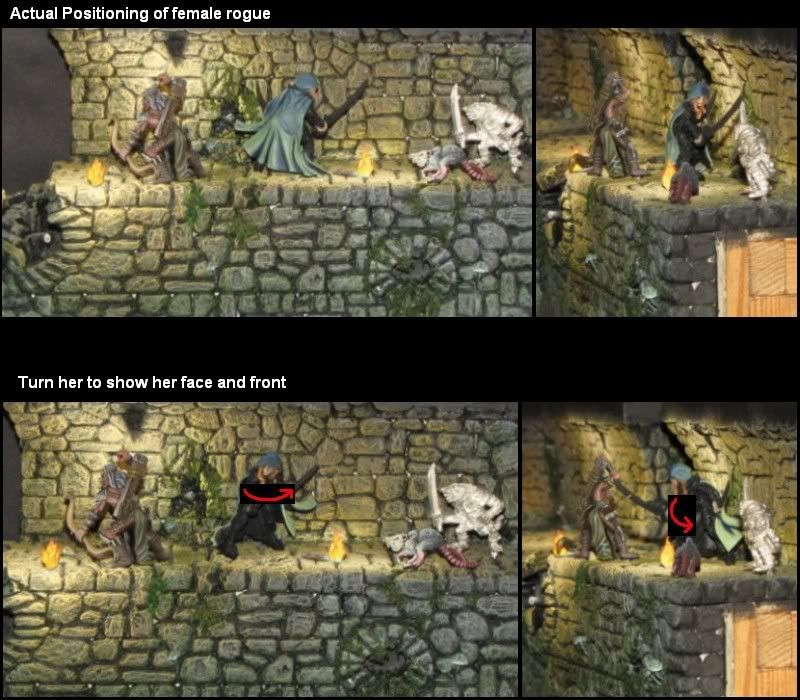
Concerning the female rogue - 'Deladrin' from Reaper - I'm thinking about whether not to change her positioning: Right now, with the actual positioning, she's showing her back - which mainly is her cloak only. Her face can only be seen from the right end of the scenery, and even from there, not really good.
Which is a bit a pity, as her front has much more details to look at.

So, since a couple of weeks already, I think about turning her in order to show her front and face to the viewer.

Dela_Pos_Options_01.jpg


If I'd do so I'd have to strip off the paint (which is not too bad, as the actual shading on her cloak doesn't please me too much). Then cut off head and hood and attach it to the body approximately 90°C turned counter clockwise towards the approaching enemies. Finally remodelling the hood with green stuff in order to adjust drapery and smoothen the transition between hood and cloak.

Although I feel like doing so, I still doubt whether all this remodelling actually works and if it is worth to do so.

What do you think? I'd be glad for any decision support. Thx :)
 

khavor

New member
Really happy to see this WIP back. Hopefully we'll get to see it finished one day! I think you've got the lighting effect really working well, judging by your recent pics. And what is with you and Skels and pink rats?

I'd say, if you're not pressed for time, or feeling the "I need this project to be done soon" bug, go ahead and turn her. I agree that she'd look better composition wise if you could at least see her face. If you don't do it, and it's bugging you now, it will always bug you. ;)
 

DunErwit

New member
And what is with you and Skels and pink rats?
I always thought that skeletons and - especially pink ;) - rats were part of classic fantasy.
This setting is inspired by books such as the "Forgotten Realms" and games like Oblivion/Morrowind or Baldur's Gate - when you venture into the different dungeons, you always find relics of former, unfortunate adventurers... and sometimes even their bones.

Concerning the (were) rats, when I started, I was looking for a different skin tone than the one of normal humans/rats in order to bring out their unnatural were existence. It happened more or less by accident that the skin turned out pink - or "bullock blood" as the colour I used is named.
I already intended to change the skin of the remaining rats a bit in order to get some differentiation like I do with the heroe's skins, too.

I'd say, if you're not pressed for time, or feeling the "I need this project to be done soon" bug, go ahead and turn her. If you don't do it, and it's bugging you now, it will always bug you. ;)
Well, this scenery ought to be finished two years ago already - therefore: No need to hurry any more ;)
And you're probably right: If I wouldn't do it, I might be bothered by it every time I look at it.
 

BPI

New member
Hi DunErwit, re. the positioning of the rogue. I think with a diorama as big as this, let the story come first & worry about her face being obscured from the front less. As long as it looks as though she's reacting to what's going on around her, it doesn't matter which way she is facing as far as the compisition goes. I think that's what I mean :D You could always put some decorative freehand trim on the cloak to liven it up a touch?

Cheers, B.
 

DunErwit

New member
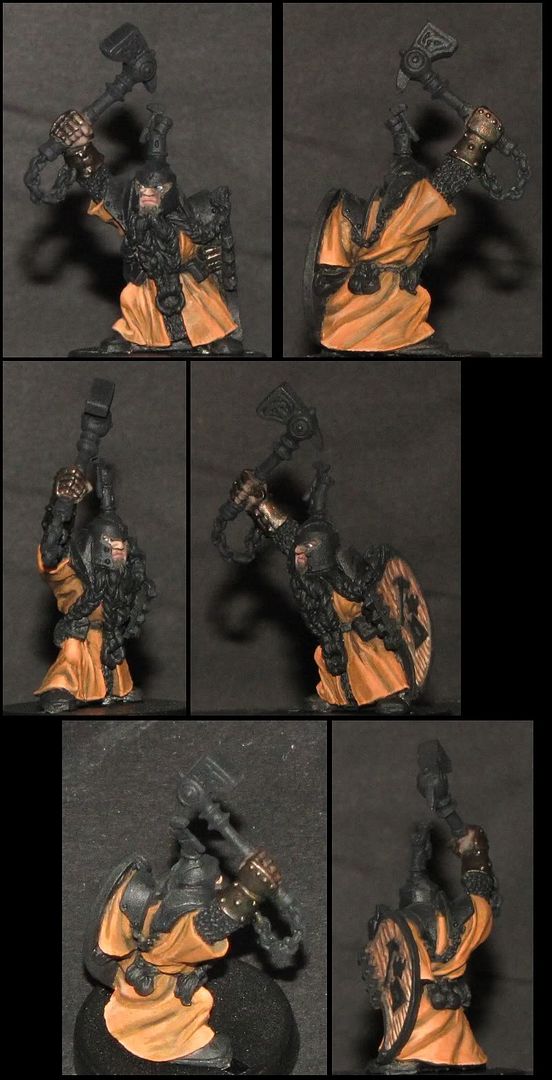
Progress on Dwarf Cleric

Just posting the actual progress on the Dwarf Cleric.

bersichtKagoinFortschritt01.jpg


His robe will get some freehand, probably runes (what else :D) - unfortunately I don't know yet, what exactly.

Far from beeing finished... probably won't get him done this week :thinking:

Continuing with his armor, iron/silver.
 

DunErwit

New member
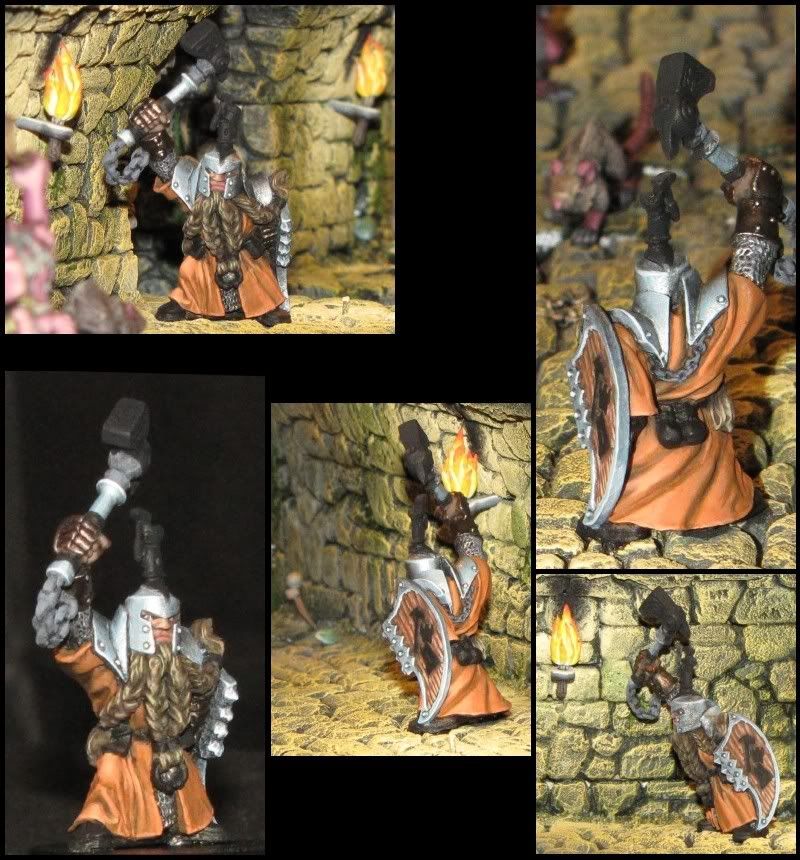
Well, as expected the dwarf is not yet finished.
Nevertheless I did some progress on his armor and his beard, and his gauntlets got some highlighting.

bersichtKagoinFortschritt201.jpg


I'm a bit hesitating whether to paint his symbol - hammer and collapsing tower, both on his shield as well as on top of his helmet - in gold or not... His chain-mail is silver, the chains will become silver too, the armor and hammer got a bluish-silver, and the gauntlet GW tin bitz. Could be that adding gold on major parts now is one metal too much...? On the other hand, gold would fit quite well to the bluish-silver and the orange of his robe...

Always those decisions ;) Any suggestions are welcome.
 

BPI

New member
The problem with gold for the idol is that it doesn't tarnish, which only leaves you with dirt & shadows for defining the detail. With the OSL you've got an advantage but I'd still be tempted to paint it in flat colours like a mini-mini diorama or in metals with oxidation. I hear verdigris can be nice and might go with the orange ;)

Cheers, B.
 

SkelettetS

New member
hey the dwarf turning out nicely! i dont see a problem with adding gold to the other metal details, but then id say dont use another colour on the mini except earthly colours, becase then it probably will be too much. people tend to pimp their minis with purple pouches and green belts, or any worse the impossible colourscheme blue/yellow/green/red. :tremble:
 

DunErwit

New member
Thank you both :)

Meanwhile, I tried to imagine the symbols painted completely in gold. And apart from the problems painting that colour may cause, I've got the feeling, that so much gold may dominate the mini too much anyway.

On the other hand, I don't feel like aged metal / verdigris would fit to this dwarf: What upcoming heroe would he be, if he didn't take care of his equipment, especially as a honest cleric? ;)

That's why I am thinking about painting the symbols either as mini-in-mini, or in bluish-silver; and then bordering only edges and small elements sticking out of the surfaces with gold. Should give it a noble look, but hopefully not overload it.

@Skels: Well... might be a bright idea: If his enemies would be as scared about adventurous colour schemes as we are, perhaps this would increase the partie's chance for victory...? Although they wouldn't need it, of course ;)
 

Kretcher

New member
Very nice work here, will subscribe to this thread. Just amazed at the size of this diorama. Will proberbly never make anything this big myself... looking forward to see updates.
 

DunErwit

New member
What kind of water effect to use...?

Hello everybody :)

Well, finally time is close when I have to create the water effect for my sewer.
But I have difficulties to choose which kind of water effect to use.

Dimensions / volume:
- The short upper channel: 8cm long, 3,5cm wide, approx. 0,5cm deep = approx. 14cm³ (= 3,15" x 1,38" x 0,2")
- The lower main channel: 50cm long, 6cm wide, approx. 2cm deep = approx. 600cm³ (=19,69" x 2,36" x 0,79")

= approx. 620cm³ in total

Main request:
I want to colour the water in a brownish/greenish tone; the closer to the ground the more intense the tone should be (as the muddy channel water probably will be muddiest near to the ground).


Options after using google and visiting different shops:

1. Water Scenics Realistic Water. 1 bottle has approx. 470ml of content, so 2 bottles probably might be sufficient. Costs: Approx. 40 EUR.
Advantages: Can be coloured; (hopefully) flows into every little corner; only 1 component, no hardener needed
Disadvantages: Expensive, especially if it wouldn't work...; evolution of heat while hardening unknown?

2. Some standard transparent casting resin. 250ml per bottle = 3 bottles in total. Costs: Approx. 45 EUR.
Advantages: Can be coloured; (hopefully) flows into every little corner; hardens within 3 hours.
Disadvantages: Even more expensive; evolution of heat while hardening for sure; success very sensible to the ratio of the ingredients (resin and hardener)

3. "Just" modelling the water surface with 2mm acrylic / Plexiglas slab and some water effects on top. Costs: Unknown, but probably cheeper than any of the water effects mentioned above.
Advantages: No worry about whether any resin flows into the corners; hopefully easy to build up; cheap
Disadvantages: How to colour... especially with at least 2 different intensities? And probably not suitable for the smaller upper channel due to the debris which are already fixed to the ground.


Well, as you can see, I am quite unsure which option might fit best for my problem.

Last but not least:
For options 1 + 2, how to seal the front and right side of my diorama, so neither WS Realistic Water nor any other resin flows out of it?
The sealing should only be temporarily and easily to be removed without glueing to anything after hardening of the water.
Would it be sufficient to use Vaseline on the sealings surface to prevent glueing?


I'd be very thankful if someone had some ideas or suggestions :)

DunErwit
 

Benihana

New member
Read through the entire post (I've given it a look before, but didn't read the details), and have a few suggestions, which are of course just that.

First of all, I love the rats (Sssssskaven!), and they remind me of my very first MMO, Gemstone III and fighting giant rats in the tunnels... or something to that affect. I do love the sculpts you've picked, especially the scroll bearer (I need to find one myself!), though I hate the faces, they look a bit monkey/aquatic to me. Or maybe Jar-jar Binks-ish.

Anyway that doesn't really help you. My rat suggestion, is to have a few smaller ones crawling/swimming wherever you need to make things a bit dynamic. You've got all the vertical space between the walkway and the water to use! Or perhaps coming out of the water and going up the stairs! Wet rats... *shivers*

I think the verdigris suggestion is spot on, as long as you didn't try to add other colors to the mini. Blue-green is pretty close to complementary for that orange you've got there. I agree with not painting belts and pouches crazy colors, except when applied to the current MMO crowd which seems perfectly okay with stuff like:
ScreenShot_012408_133914 by benihana, on Flickr

I also think little rivulets of water, or small waterfalls, coming from the openings/mossy spots would be nice. Not all of them, but a few. Hirst has a recommendation for how to do something like that as well, I think building up on fishing line.

Overall, looks great, keep it up!
 

DunErwit

New member
Hi Benihana,

thx for your answers.
I already had a look at the links, and I think the Hirstarts solution with the packaging tape might work best. Finally, I do not need to take foam as long as I fix tape to the surface.
Problem - hopefully - solved :)

Last but not at least, I bought a bottle of Woodland Scenics Realistic Water yesterday afternoon for a first attempt. I will build up a very small wall with plaster today for experimental purpose: it confuses me a bit that they write on the bottle "... Make base of water body liquid-tight and apply water-insoluble paint up to the rim..." - well, all my acrylic paints are water-based; nevertheless the paint is ment to be water-resistant (more or less ;)).
Must I fear that the Realistic Water will destroy my paint job?

Concerning your rat suggestions, I'll see what I can manage. As I wrote earlier in this thread, I don't have smaller rats so far, and the giant rats I have left don't fit to the stairway from their movement / posture. And my modeling skills aren't good enough for modeling some myself... Perhaps I'll try when most of the rest is done.

Rivulets of water are already applied to the walls (e.g. to the large hole in the wall on the right side or to the smaller, upper one almost in the middle of the diorama), but can't be seen very good from the pictures due to the camera's angle towards the diorama and the poor intensity of the reflection.
 
Last edited:

DunErwit

New member
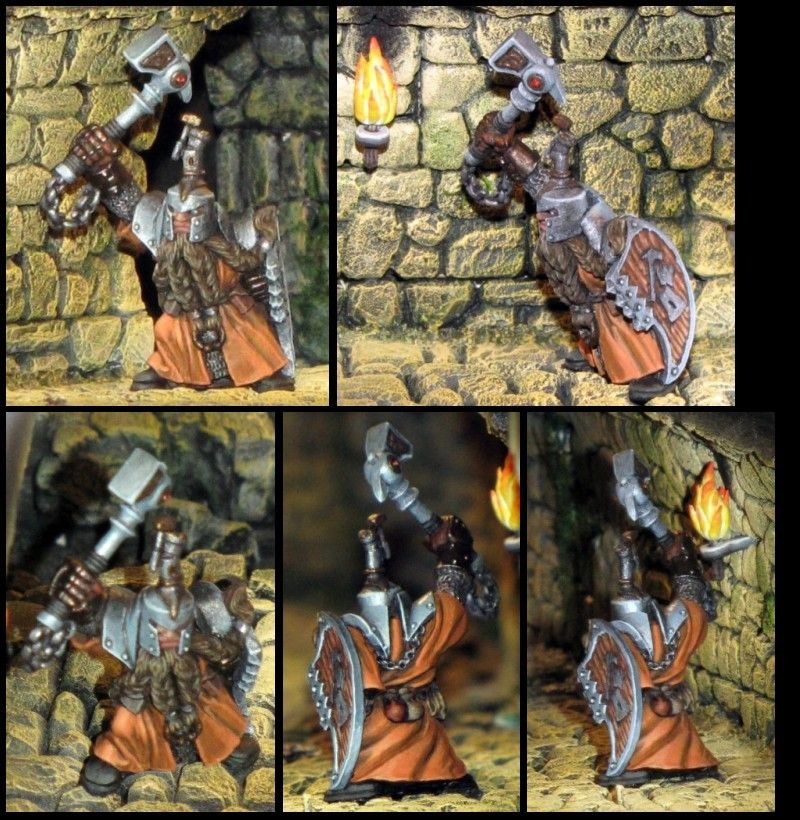
Dwarf Cleric finished (?)

It took me "only" 2 months to finish the dwarf cleric - but for a long time I wasn't really in the mood to do it. Not at least as I had some problems imaginating in which way / colour schemes to finish him.
But finally here he is:

bersichtKagoinFortschritt301.jpg


I've choosen to practice the verdigris first on some other mini; and last but not least I am not convinced whether verdigris-ed equipment fits to a dwarven heroe. Especially dwarves are known for taking care of their armours and weapons :)

Nevertheless I am a still bit in doubt whether to add some details to the robe or not...


Furthermore I have added some greens to the channel's ground, e.g. algae or the like. I used natural, dried moss I have collected in our garden.
Once I have glued more moss on the left side of the channel, everything should be ready for the "flooding" with muddy, slimy Realistic Water :smile:
I am quite curious whether it works and whether it will look as intended... :nailbiting!:

KanalgrundmitPflanzen.jpg


I will start now building up my little test wall and ground for the Realistic Water.
 

Benihana

New member
"... Make base of water body liquid-tight and apply water-insoluble paint up to the rim..." - well, all my acrylic paints are water-based; nevertheless the paint is ment to be water-resistant (more or less ;)).
Must I fear that the Realistic Water will destroy my paint job?

Wouldn't hurt to lay down a layer of clear coat I think. Was hoping someone else would respond with an answer!

I think the tape is sticky-side to the foam, and the foam provides support so the tape doesn't just push the tape off. Might not be a problem with the sticky-side to the model, but you may end up with a rough surface or tape glued to the realistic water. ><

Concerning your rat suggestions, I'll see what I can manage. As I wrote earlier in this thread, I don't have smaller rats so far, and the giant rats I have left don't fit to the stairway from their movement / posture. And my modeling skills aren't good enough for modeling some myself... Perhaps I'll try when most of the rest is done.

I went to put together a little rat pack for you, looked at where you live and how much shipping would be, and balked. You could probably buy a small rat army for the shipping alone. :/ If I find a better shipping method, I'll shoot you a PM.
 
Back To Top
Top