WIP: Ambush in the sewers

DunErwit

New member
Were-rat leader finished

Thanks you both :). Stage 3 Option 1 is my favourite, too, although that Stage 2 Paladin with the two-handed sword looks interesting to me, too, just focused on the mini itself, not its position in the sewer.
Anyway I’m thinking about whether not to move the dwarf just a very little bit diagonally (2-3 mm) towards rats and wall in order to gain a bit more space between him and the Fighter. Last but not least, there’s a mage standing on the wooden planks and casting an energy sphere spell that is supposed to pass right between them and to hit the rats.

So, further suggestions still appreciated :)


I used the Epoxy water's curing time for finishing the were-rat leader.
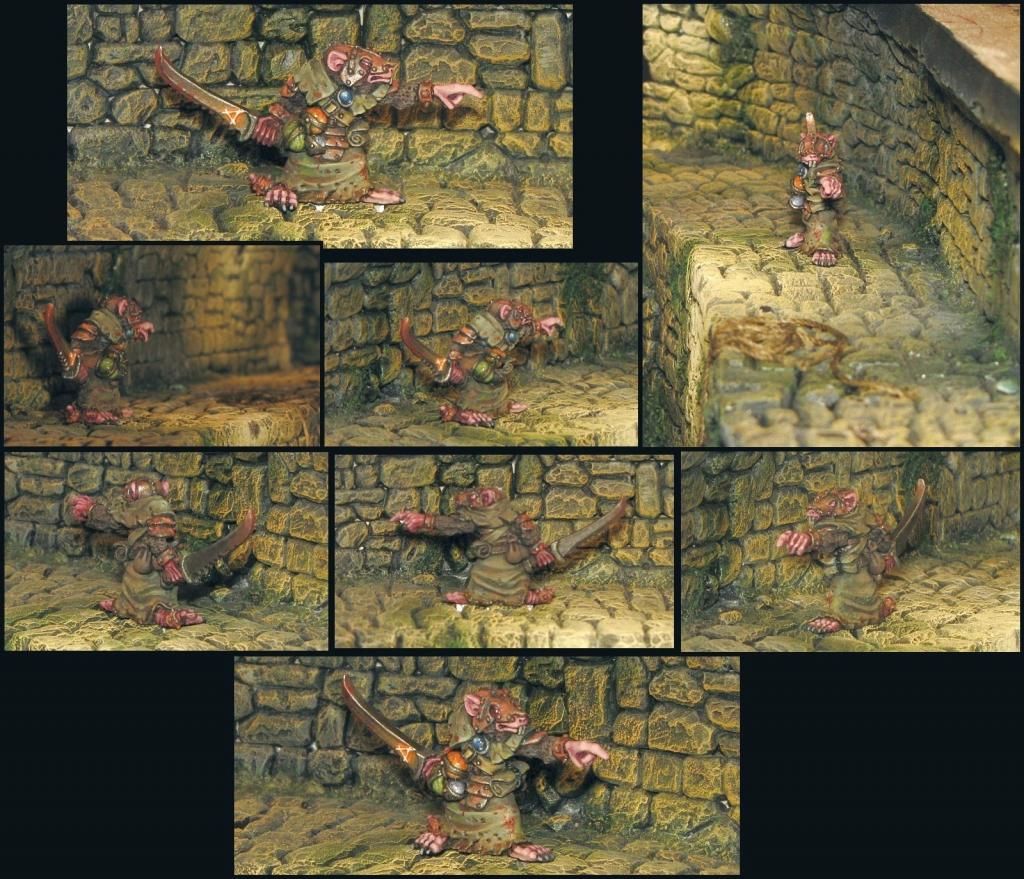


It took me two funny attempts until I decided to paint the blade in common dark iron/metal with just the symbol glowing locally orange.
(First, I wanted the blade to glow in a green magic light – it was much too much green in total on this mini and didn’t look “right”. My wife asked me how metal was able to be mildewed ;) So then, I painted it over completely so it was supposed to be an evil purple glowing magic sword – result was better than the green one, but still awful. So I had to go back to square one… :/ In the end, his skin tone as well as the green cloak and the coloured spheres make it quite difficult to add another (evil looking) colour without ending up with a colourful jester rat that could better tell jokes at the king’s court :D)

Hope, it isn’t too much rust, dirt and stains… on the other hand, his steel armor certainly isn’t stainless, and it should be hard to find any laundry service down there ;)

As usual, any comments or proposals appreciated.
 

kathrynloch

New member
Hi DunErwit! Nice to see ya! I'm just returning from a long break myself. Love what you're doing with the diorama. Even though I'm late to the party, I had to agree with Stage 3 Option 1. If you look closely, the Fenryl Female Paladin is off balance and back on her heels, which is perfect for your setting (if someone already mentioned this, my apologies, I only scanned through the replies once I saw the photos. lol!)

I really love your rat leader - my only tiny, tiny, miniscule concern is that he appears to blend in very well with the wall but it might just be the photos.

On a side note, there's a Kickstarter currently in progress by a company developing LEDs, Fiber Optics, with "mini" 9 volt batteries especially for miniatures. They're called Powered Play Gaming - the kickstarter blew up and they 200% funding in the first two days and still going strong. That's just an FYI for ya in case you're interested in it for another project down the road.

Fantastic job! Keep it Up!
 

DunErwit

New member
Thx kathryn :)
And yes, that's what I like the most with those two Fenryls: They add a little mory dynamics to the scenery. Originally, I was even looking for a (female) fighter that was in a stroke and and the weapon close to hit an opponent. Unfortunately, I was not able to find any that suited well enough to the scenery and to me... (if they have such a posture, they are either male or half-naked - or both at the same time ;))
But I think, that Fenryl Stage 3 option 1 will do it.

Concerning that rat leader: His chameleon abilities come mainly from the photos, though the green tone of his robe + dust certainly are quite fitting, too. But it doesn't look so extreme in reality. I'll try to get some better photos of him in the next days, provided my camera's batteries won't fail as fast as they did yesterday evening.

And I'll have a look at that Kickstarter project, thanks for that tip, too :)
 

DunErwit

New member
Back again

Hello :)

After a very long, long time, busy with family, PC games Tomb Raider & Skyrim and hindered by some health problems, I finally managed to proceed with my project.

What's its status?

Well - unfortunately I didn't even finish the water fillings last year.
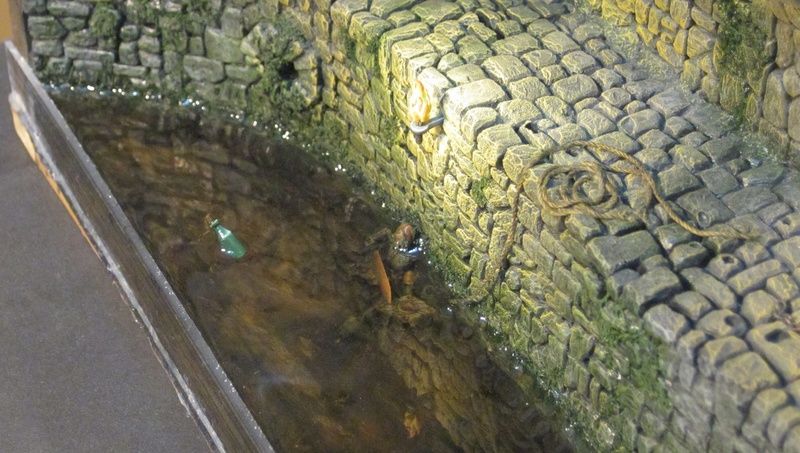
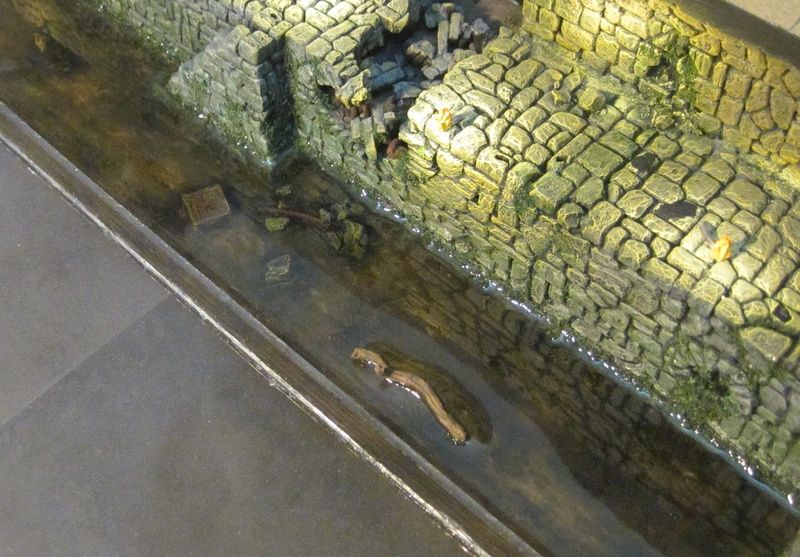
It was only yesterday, when I did the next-to-last filling and positioned a bottle and a large branch into it, both self-sculpted.
I started the filling at 11 p.m. yesterday evening, supposing to be finished by midnight latest, according to the casting resin's instructions which mentioned that the resin's processing time lasts for only 30-40 minutes... Ok, theoretically, everything should be fine; bottle and branch should then nicely be fixed in position, resin should have started to cure, nothing to worry about.

Guess what, as if! => I finally went to bed at 4:30 am :moon:!! Everytime I've loosen my hold on that branch, it sank way too deep into the new 3,5 mm filling. So I lifted it again and again and again and again - for about 4 hours in the deep of the night until that resin finally really started to cure and fixed that piece in position... :/ Fortunately, there were World of Tanks and Ego Draconis to pass the time: 10 minutes playing, looking at the filling and the branch, lifting, waiting, re-positioning, 10 minutes playing, and so on and so on... And I listened to music I haven't listened to for the last ten years, thanks to my MP3-compilation.
So much about 30-40 minutes of processing time ;)

Isn't there anything I won't do to get a result best as possible? And who needs sleep? It's just overrated :cool: :male-fighter1:

So, here are some pics to share.


In total, I am very satisfied with the resin and the casting result so far - looks really like water. I certainly would recommend the resin to everyone who plans to handle similar quantities of artificial water - joining the advice to start larger and more complex casting sessions not just in the middle of the night ;)

Only one last 0,5 - 1 mm filling missing, and the lower level is done.


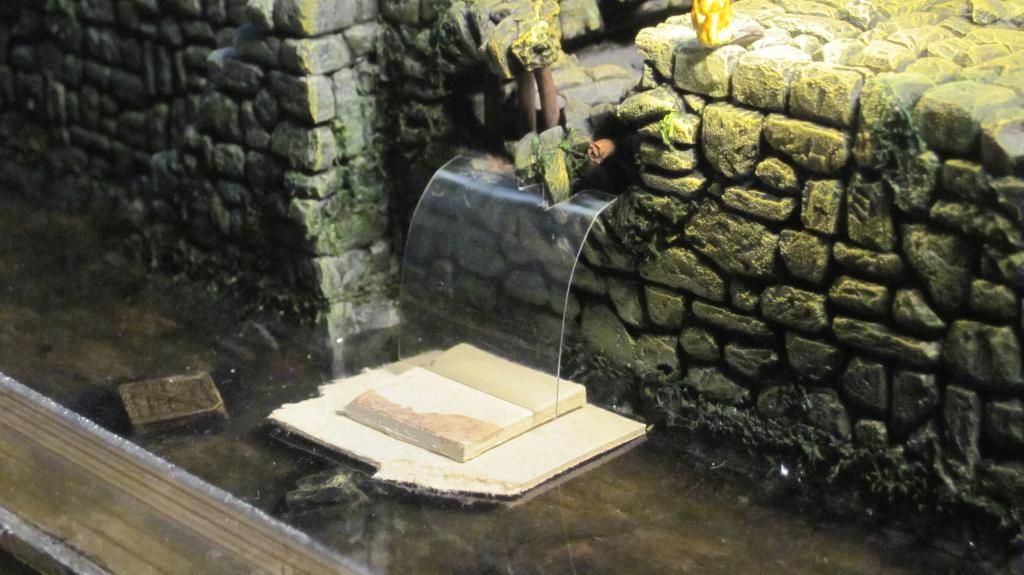
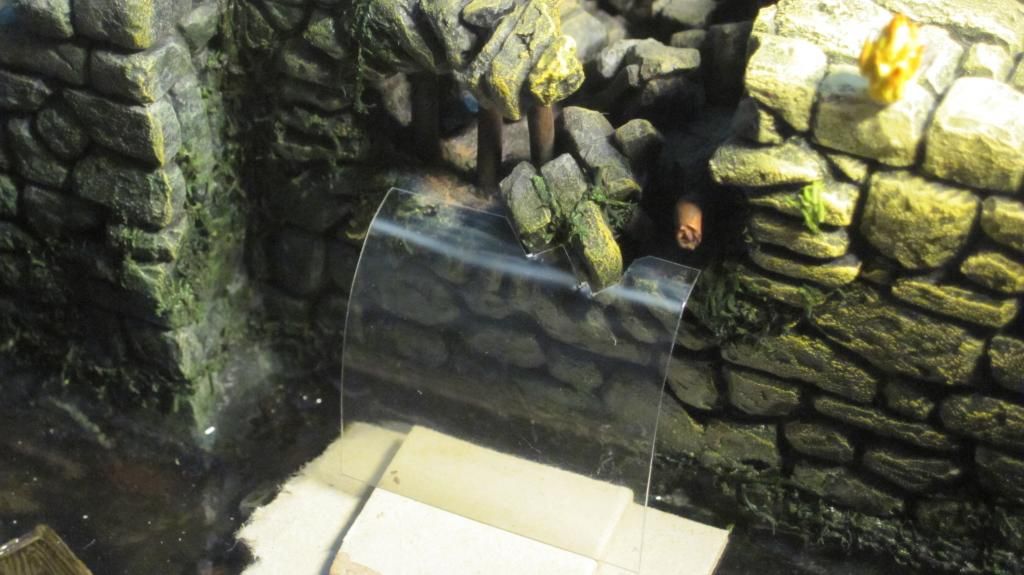
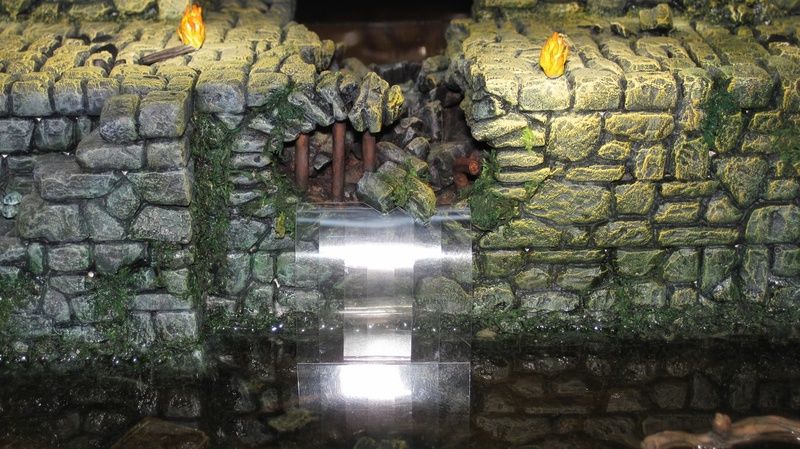
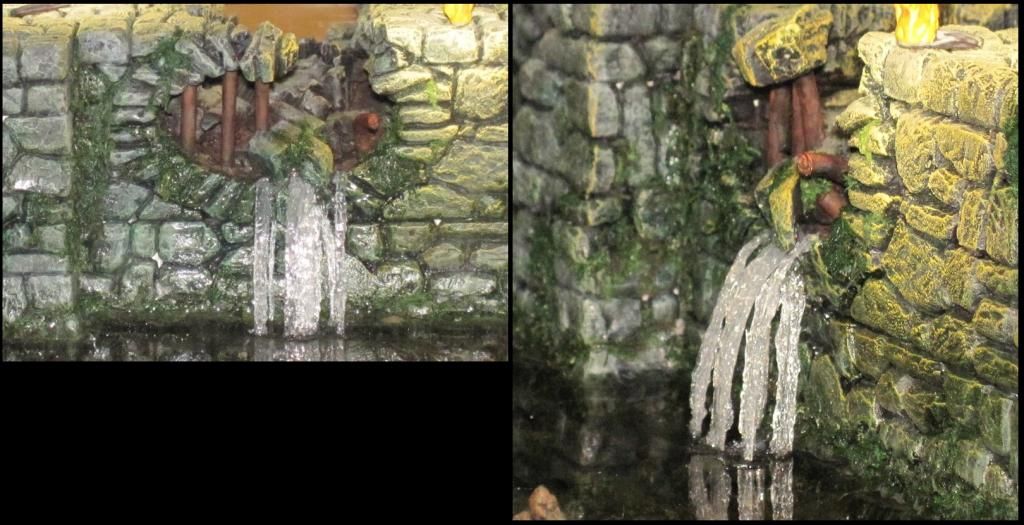
Second, I give some thoughts on how to build that waterfall. As pictures show more than I can explain, just have a look:


There will be three more levels of transparent plastic sheets just below this one, each one smaller in width than the one above, to shape and adapt the waterfall best as possible to the upper channels shape. They will be fixed together with transparent acrylic. Finally, it shouldn't be a great problem to shape the waterfall's surface then. At least, I hope so.
Any experiences and recommendations are welcome :)


Last, I started to paint the last two (were-)rats. But as they are still in a very early stage of painting, I haven't made any photos of them so far.


Nothing left to mention for the moment. I just hope I'm able to get back in business and that I can proceed just a bit faster than last year... ok... doing less would be quite impossible ;)


Wishing you Happy Easter!
 

wargamesculptor

New member
The water effect looks great, even though you had to stay up until 4. the clear acrylic sheeting is a common way of making waterfalls and can look great with the right amount of texture.
 

Kretcher

New member
Fantastic the thread is alive :) nice having you back. really like this huge diorama that you are making. always enjoy reading new things in this thread :)
 

DunErwit

New member
@Wargamesculptor: I'd be lying if I'd say I came up with that idea on my own ;) Read about it in a German Model Railway Forum, but there, the modeller has built a river in scale H0 (1:87) or even N (1:160), don't know, and didn't work with such amounts of resin, but "just" painted the river with a couple of clear acrylic layers. Looks awesome (=> Link; sorry, text and explanation are in German.).
So, I am quite curious how it will look like in 30mm (1:60) and a "real" "water" depth of 0,3 - 0,4 mm. At least in my imagination, that waterfall just can't be one single acrylic sheet with a bit of texture - it must have some more depth, too, right?
Just sitting over the second sheet, should be able to finish all of them still this evening. Just leaves the question whether to glue them together still today or better tomorrow - for some reason I don't like night sessions any more ;)

@Kretcher: Thx. Will do my best not to disappoint you ;)
 
Last edited:

wargamesculptor

New member
Have you tried the clear silicone sealent method before ? (The stuff you seal baths) seen this used a couple of times, and can look good as you can sculpt the flow while it's wet.
The drawback with this method is depending on the thickness can take a long time to clear
 

DunErwit

New member
I intended to combine it, sorry for having confused clear acrylic and that clear silicone in my posts above, cause here, in Germany, that sealent is sold in acrylic, too: The clear acrylic sheets as "carrier", and that acrylic/silicone sealent as glue and texture material. Same sealent I already used for sealing the channel in order to prevent the pouring out of the resin. So, the sealent already lies next to me. Exactly cause of the reason you mentioned: I can sculpt it quite well while it's not cured. And when it's cured, it is not 100% clear any more, but a bit milky, which should give a nice base depth effect for the waterfall effect. Finishing with white acrylic colour and gloss varnish.
Furthermore, instead of normal glue, clear acrylic/silicone really has substance so it should provide to the waterfalls scaled "thickness" of 0,3 - 0,3 mm. (Hope, I explained it almost correct in English; did my best not to translate it word by word from German, but... well... not always easy as I don't know all correct (technical) expressions.)

Just finished the other three sheets. And when looking at them placed on the Diorama, I just don't know whether two or three in total aren't perhaps sufficient... On the other hand, I plan to attach the "raw" waterfall without any detailed texture already in the next step, before filling the upper level with resin. This way, the waterfall works as barrier for the upper resin at the same time - can't need it to have a real real (resin) waterfall on that diorama - not at least, cause it will leave almost nothing of it in the upper channel :D
But for sure - this decision is only a minor "difficulty" ;)
 
Last edited:

Alexandra

New member
First of all, welcome back.
Second, I'm envious. Every time I work with resin, it ended either in disaster or the resin was left with a tacky surface ( which is almost a disaster but not quite ). You guy just make it look easy!!!

Can't wait to see that water fall done.
 
Just discovered this WIP thread, and I am impressed. Your on the right track looking to model railroaders for scenic advise. They lead the way when it comes to terrain. You've chosen a very classic D&D scene which speaks to me as a former player. I only have one suggestion that may help with the feel of this diorama. I know this project has been going on for awhile, so I'm sure you know exactly what you want out of it by now. But I noticed a couple years ago you set up all the players just to have a look at how the set up, and you were warned that it may be too busy. Well, my thoughts on skaven/ratmen/rats dictate that the thing that makes them effective, and the atmosphere you want to convey is one of a horde. They need to be POURING out in mass from certain areas. Bunch them together, give them a lot of movement. It needs to look like a massive herd of rats. A group of 3-4 just won't cut it. They need to be running on top of each other. If you can't do this with the ratmen themselves, do it with rats. Have them just pouring out of a crack in the wall or something, running over each other to get at the adventurers. Just a thought that I think will really really add power to your scene.
 

DunErwit

New member
@Alexandra:
Fortunately, the resin I use didn’t make (alomst) any problems at all so far. No disasters, no ticky surfaces at all; in contrary, after 8-10 hours, the surface already has cured completely and is so smooth and clean, that I easily can continue working on the rest of the diorama already, able to remove any dust or dirt that falls down onto the resin’s surface accidentially without any trouble.

The only tiny problem I had once was, that the surface of the last filling I did last year before the large break became in some areas a bit milky and dull. Don’t know what the reason was – perhaps not perfectly mixed –, but it was easily solved with a single gloss coating – completely clear and glossy again.
And the recent filling worked very well again, especially when considering the fact, that the package is open for almost 1 year now. That’s what I feared the most – that the package’s storage life had expired, and that I either would ruin everything I achieved so far, or that I had to re-invest in a new package though the current one was only 60% empty.

Anyway, I would have get quite mad if it wouldn’t have worked so good, as I’ve certainly choosen one of the more expensive resins for the reason, that it received very good reviews especially from professional (railway) model makers. That 1000ml-package did cost 45 EUR… and when the very last filling will be done, almost the whole package will be filled into the diorama… :O

But as mentioned before, apparently, it is worth it – so for any future dioramas needing artificial water, I’ll buy it again.

Here’s the link, if anyone is interested to have a look at it: VossChemie High gloss coating resin (page is in German, sorry)

@BloodFather:
Thanks for your suggestion.
One the one hand, I do share your opinion. On the other hand, I really worry that it might get too crowded… Furthermore, rats crawling over rats and rat-men probably would make larger conversion works necessary which isn’t my area of expertise yet – and which isn’t too easy with metal casted minis.
And at least in my imagination, these aren’t simple rat-men, but much more dangerous high-level were-rats attacking the heroes. So they will have a lot to do defending themselves already right now. But of course, this isn’t something an observer can see, for sure.
For the meanwhile, I’ll continue as planned – first finishing my current master-plan. But it shouldn’t be any problem to add a couple of other rats afterwards when the finished scenery lacks some threatening atmosphere and effect ;)
 
Last edited:
Yeah, completely understand these limitations. I wouldn't really be able to convert either. Maybe not so much on top of each other as just densely packed. And the rest is just a challenge for you to make the spacing balance correctly. I think maybe have the adventurers as close to each other as possible, empty space separating them from rats and ratmen that are as closely packed as possible. This was it exaggerates the numbers.
 

Alexandra

New member
Thanks for the tips on the resin, I will look it up. The price is about right: the crystal clear I buy here is that price per Kg. Expensive compared with other materials but for resin is the normal price.

The problems I'm having is probably related with the polyester resin. Never used epoxy clear resin, so if you say you never had problems I really have to give it a try.
 
Last edited:

DunErwit

New member
Ok, at least this evening I followed SkelS way of painting and modelling and will try to come along with only five hours of sleep ;) and started modelling the waterfall.

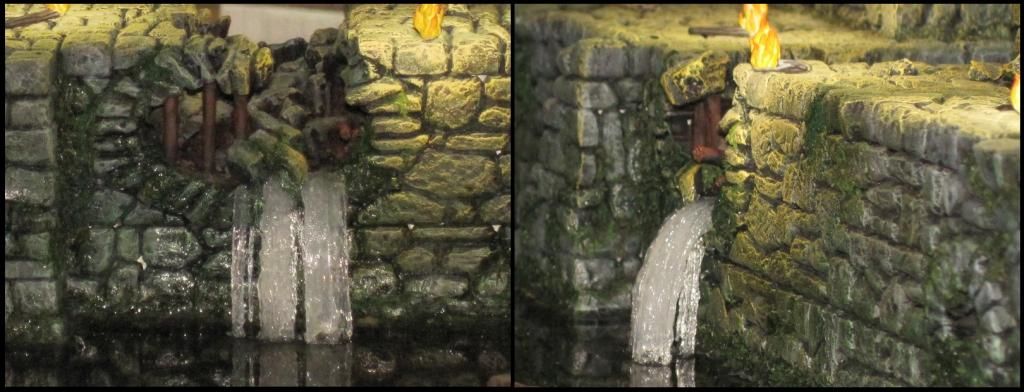
As described earlier, I first had the idea of building up simply three levels of plastic / Silicone Sheets like this:


But when I looked closer at it during the last days, I felt unhappy with this concept - it looked a bit unrealistic, as if something was missing - or better said: Too much.
I finally realized that this way of modelling the waterfall would be too imprecise since two larger broken Stones block part of the water right at the channel's edge where the waterfall is. Means: There simply can't be the same flow of water(fall) right directly behind those stones.

So, I improved the concept by dividing the large waterfall into smaller and even smaller sections.

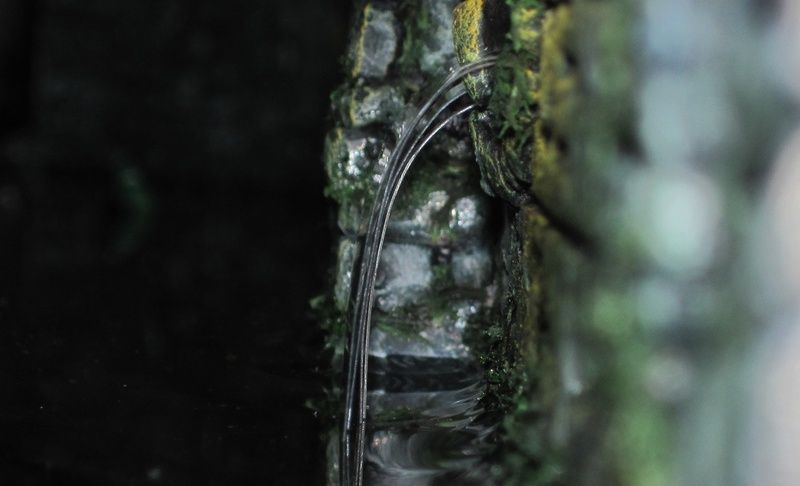
Here are now pictures of this evening's work, showing the two most inner small waterfalls pouring through that little hole between the two stones. They later will be hidden mostly by / lying underneath the main water stream coming through this hole, but I made them, first for training purpose, second cause they will add substance to the waterfall as a whole in the end.


Continuing my thoughts on the waterfalls composition, the hole's main stream then won't be fully connected to the two other larger streams on its left and right side, right? Should be three independent flows, which might interfere perhaps a bit, but don't build up one single, large waterfall, true?

At least, I hope that this is a better approximation of the waterfall's physical reality.
In case anyone of you thinks differently about it, please let me know. I am far from being a physicist ;) And since everything is fixed only with Silicone, it is no problem to remove it completely without leaving any traces.

(In this context, @Wargamesculptor: You were right: The sealent I am using is a Silicone one, indeed, not Acrylic. Don't know why I confused it...)
 

wargamesculptor

New member
Liking the first stream looks very natural, would suggest splitting the streams between the bars as well, and the flows on the outer edges should drop closer to the wall than the central ones as the pressure of the main bulk of water will be greater.
Hope this helps
 

DunErwit

New member
Thanks for your reply, yes, helps :) Had not taken this into consideration before, thx.

Apart from this, not many words... just working on the second step of the waterfall(s). Building it up step by step. I am really curious and a bit anxious, how it will look like in the end...:sweat:
As usual, I am thankful for any advice :)


DunErwit

New member
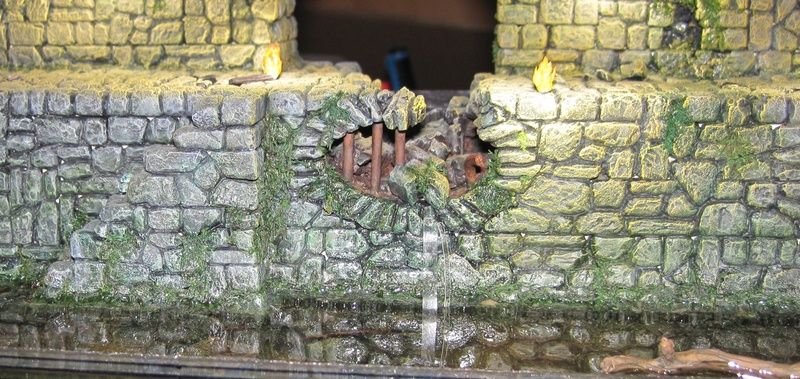
Third step. Decided, to build up the rest of the right part of the stream from one plastic sheet. Did cut the most right side twice top-down in order to get those streams closer to the wall, as suggested.
Misses the Silicone texture "top-coat" yet.
I am not completely unsatisfied with it. Would say it already looks quite good and gets better with every stream added... but still... well... a bit... :nailbiting!: ;)


DunErwit

New member
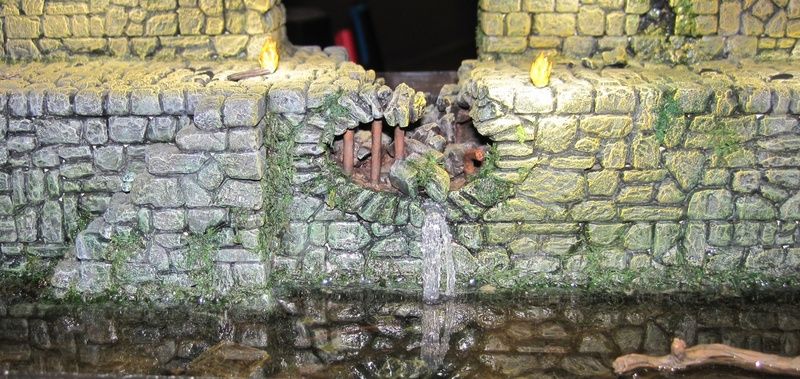
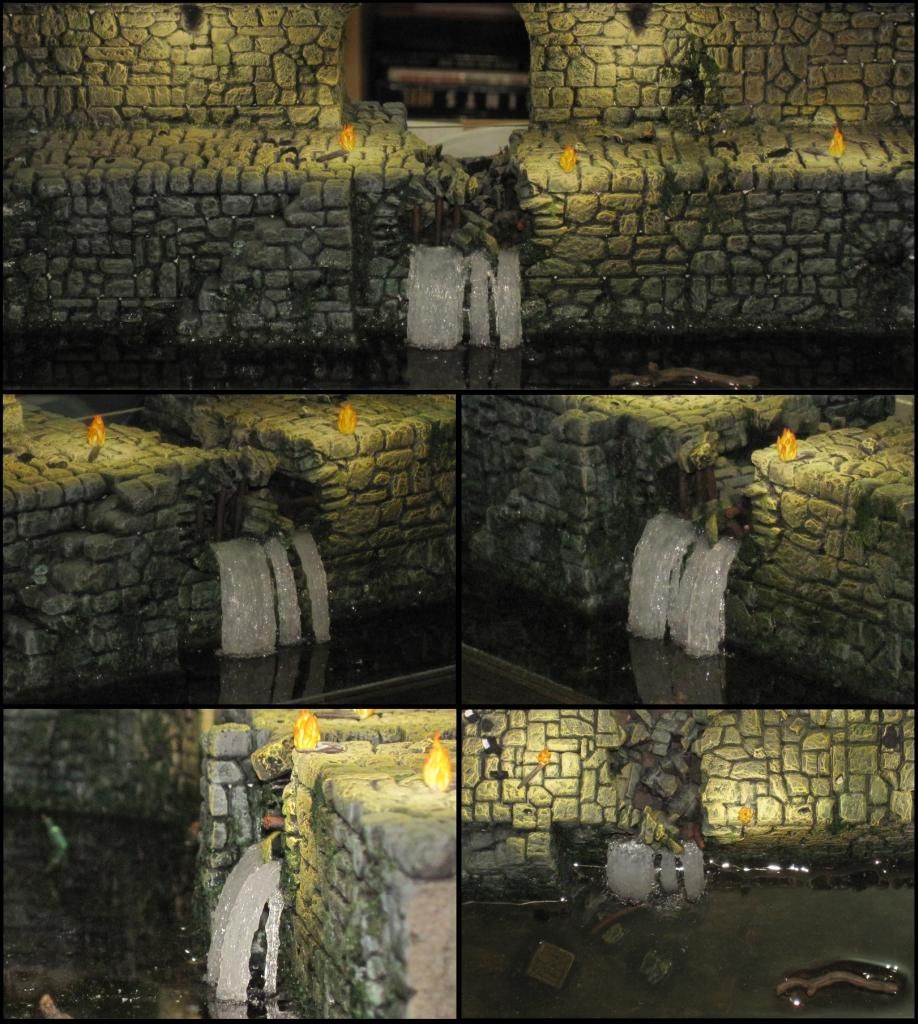
Almost finished, I think.

Took me 2-3 hours - cause when I showed the first complete waterfall to my wife, on the one hand she was quite impressed, on the other hand, she mentioned it would look a bit too massive... Unfortunately, I had to agree - it was something I realized, too, when the last, left part was nearly finished. But until my wife said it, I thought it was only my modeler's perfectionism...

So from this moment on, I had "no choice" than to rework the streams. Thankfully, they've been attached with the Silicone, so removing them without any damages and traces and re-attaching them after the rework was not a Major issue. I reduced their thickness by about 1/3 - 1/2, I'd estimate, and removed one of the first small streams closer to the wall completely.

Think, the result is better now.


Only little problem remaining is the colour and brightness: It is way to clear and bright for that sewer... far from being dirty, muddy, slimy and disgusting. And the waterfall now is the diorama's eye-catcher, for sure, at least until minis and the other stuff is added, simply cause it sticks out.
But at least diluted acrylic colour doesn't really stick to the Silicone, as supposed.
I am now thinking about whether to add some very, very small streams of brown Silicone, just a very thin application of it. But I am not sure about this...

But in any case, I am quite happy with this week-end's result. Will finish for today and see what comes to my mind next :)
 
Back To Top
Top