First WIP in 15+ years...help!

gsr15

New member
GSR's WIP

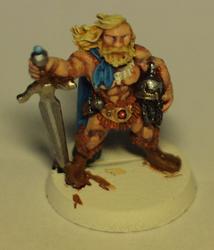
So I haven't painted for probably 15-16 years, but got the urge to try it again recently, dug out this old figure I'd primed back then and went to town. This is also my first attempt at anything with more than just a face and hands worth of flesh and I got to this point and became frustrated at how it looked. Went searching the web for ideas and discovered this wonderful forum. However, after reading through a ton of stuff, I'm just not sure where to start! There's so much good information, and so many amazing projects, its a little overwhelming. Finally got around to taking some semi-decent pics of the figure so here I am, hoping I can be helped.

So the issues, as I see them...I know I went too dark on the flesh shading, and could probably use another layer of highlights, the cloak isn't as smooth as I'd like it to be, and the eyes certainly came out a little googly. I'd love to know how to give better depth to the hair, perhaps a blond wasn't the best choice for the first time? The fur just doesn't look quite right to me, and the boots are a mess. I'd really appreciate any suggestions on how I might fix these issues (if possible), or just some tips as to how to do it right the first time, for the next one.

Thanks!


Last edited:

devoncodain

New member
I actually like the cloak it look really good to me. The eyes yeah they are googly but that is a big trial and error thing on mini's. Sword blade is nice also. The shade on the skin looks like it is to wide narrower shade lines would do good I think especially around the knees. With the hair you could have started off with a light brown base and then highlighted it up to blond and given it some more depth. Same with the fur it needs more shade and highlights to it. the boots are not that bad in the pic they have a good base coat on them from what I can see. Necklace is the same kinda flat needs more highlight and shade. The gem in the belt is awesome I really like that good job.

Other than that I think for coming back from a 15 yr hiatus this is a really good job after a little practice getting your paint fu muscles worked back out and exercised you should be mopping the floor with my stuff. Welcome back to the hobby.

Also you could try out this site they are a bunch of good people that always help me out when I ask [url=http://www.wamp-forum.com/VB4/index.php?referrerid=1117]WAMP[/URL]
 
Last edited:

BPI

New member
Welcome GSR15, looks like a neat enough job to me for a 15 year interval! I think I'd just say, stick with it & blast through a handful of figures to get your eye back in. Digital photos will expose a whole new insight into your work compared to last century, just make sure to deal with the flaws exposed!

Go darker than you'd assume with shades & lighter with highlights (for example the bone necklace could be painted dark brown, shaded black, picked out through mid-brown, cream highlight, white dot highlight).

Check the Sticky Thread of tips & tutes http://www.coolminiornot.com/forums...Sticky-Thread-Links-to-Tips-Threads-Tutorials.

and the CMON Articles
http://www.coolminiornot.com/go.php/go/articlephp/levels/99/expand/all?

Not that you should try & plough through it all but be aware of the headings so that you can nip to appropriate pages as required. For example there is a nice simple gem one I used recently for pleasing results http://www.coolminiornot.com/article/aid/200 that could help inform your approach to his belt ruby.

Cheers, B.
 

gsr15

New member
Thanks so much for the feedback, methinks I'll do a little touch-up on this one and start fresh with a new practice mini...I'm afraid I'll do more harm than good on this one at this point, and I've got a handful of old, lower quality minis like that one that I can practice on.

@devoncodain Any tips for the fur? The only way I've ever known how to do it was like chain mail, a base coat and then a highlight (dry brush really,) are you talking about highlighting individual ripples in the fur or something like that?

@Tercha Thanks, I'll give that a try...I've been basically doing the opposite and starting with an all white eye, though I've never really been satisfied with the results

@BPI You aren't kidding about the photos, jeebus, I thought it was looking pretty good at arms length but those photos really expose the problems...do you guys paint with a magnifying lamp or something like that? I'm not sure my eyes are good enough to do some of those smaller effects like the gems in that article, and I'm already using a 10/0 brush for that stuff. Interesting tip on the necklace too, I never in a million years would have thought to start with brown and black on a bone necklace...guess I have a lot to learn about color combos and such.

Thanks again!
 

Dragonsreach

Super Moderator
Any tips for the fur? The only way I've ever known how to do it was like chain mail, a base coat and then a highlight (dry brush really,) are you talking about highlighting individual ripples in the fur or something like that?
There's a good and relatively easy way to get decent fur.
First paint the base colour.
Next Turn the Mini Upside down. (No I'm not joking).
Then using either a GW wash like Gryphonne Sepia or Devlan Mud (or a wash made from a dilute paint).
Paint over the Fur surface and allow gravity to get the paint to "pool" in the recesses. Allow to dry, then Repeat as Needed.
Re-highlight the Basecoat colour with the mini the right way up moving the brush Top to Bottom.
Add highlights along the line of the fur texture according to where your indicated Light scource is coming from. (Generally that's top right to bottom left).
Oh and welcome back to the fold.
 

DunErwit

New member
I like this mini - it is a very good start after 15 years. Don't be too self-critical :)

Shortly some of my experiences since I read through this forum and improved (a bit):

1. One colour's spectrum between dark-shaded and highlighted is much larger than I assumed formerly: Now, my skin tones reach from dark brown to very, very light flesh or even white. But most important: Both - darkest shades and brightest hightlights - often are only small lines or dots.

2. What helped me a lot with transitions on all surfaces - skin, clothes, wood, etc. - is using "Feathering":
http://www.coolminiornot.com/go.php/go/articlephp/aid/273?
It really helps to achieve smooth, good looking transitions.

3. Eyes: I start paining the complete eye black or very dark brown. Then paint it over with white, adding a touch of ebony. Be sure to leave a very thin line of black around the white - so you have the black-lining already done, and - for my taste - this way it's easier to achieve than to do it in the end. Paint the pupil, and finally add a very small dot of white for the reflection - helps to make your mini "alive".

4. Brush: Don't use a brandnew 10/0 brush for very small areas such as eyes or gems - although it sounds funny, but brandnew brushes are not yet precise enough. My best brushes already have painted some larger surfaces, before I use them for small and precise painting. After a couple of paintings and washings, they get a very thin and nice point which is perfect for eye painting and the like. Even better, if this point is slightly(!) bent/curved to one side.
Damp the brush slightly and sweep over the hairs from "bottom" to the point with thumb and forefinger just before painting.
This way, even an older 5/0- or 0-brush can lead to better and more accurate results than a brandnew 10/0 does.

A magnifying glass you can dress onto your head is a great help, especially for the pupil and the reflection dot.
 

BPI

New member
Save the tiny brushes for freehand and the like. Just a No.2 for basecoats & shading, No.1 for highlights, No.0 for fine detail like eye pupils, gem light spots, etc. Accuracy comes with brush control (practice) & getting used to different paint qualities, inc. different colours in the same range (practice). A smaller brush won't get you the results, just lots of fiddly little brushstrokes instead of a single smooth sweep. You need enough paint on the brush for it not to dry between pallette & figure too, tricky on a 3 hair brush!

I don't use a magnifier but I think it depends on preference & age! Something that hangs off your face rather than a desk mount is best though (my impression at least).

Things that have helped me that didn't require practice but were instead immediately beneficial. Hmmm, rack brain...

Look up how to make a wet pallette from household items for free!
Good quality natural hair brushes (eg. Kolinsky Sable).
One set of brushes & a water pot for metallics, another set of brushes & a water pot for non-metallic.
Invest in a "daylight" lamp to paint under (& use for photography) when natural light is unavailable.
Paper towel next to pallette for "swirling" damp brush on to bring to a point, also to remove excess moisture after rinsing (check it's clear, otherwise rinse again), dab brush between pallette & mini to blot any excess (particularly when using heavily thinned paint). - I'll leave the Brushlicking committee to try & sway you to the dark side on the prefered methods for bringing the brush tip to a point ;)
Take the time to prep your mini, mainly removal of the blasted mouldlines. Photos will help to reveal them but it's horrible to push your painting skills only to have the end result spoiled by a fat piece of flash running over the mini's face! (I speak from experience).
Keep posting WIP photos!


That necklace on your mini is very small, trying to stuff five colours onto it might be a bit much! But the point is about increasing depth with unrealistically dark shadows & bright highlights because the minis are so small (as others have covered). Try painting up from a black undercoat, using lightly thinned paint so that the black shades the recessed areas & lines between details. Not a full cartoony blackline, just when basecoating, don't worry if his armpit isn't the bright red that the topside of the sleeve is, leave it with that dulled red from a single coat. The raised areas get painted up to a smooth flat colour. Then just bung some highlights on :) It's a quick way to play with paint thinning for fast results!

Enough typing for now! Cheers, B.
 

gsr15

New member
Thanks again for all the feedback and tips guys.

@ Dragonsreach, thanks for the tip, I think I get what you're saying and I can see how that would give more depth to the fur

@ DunErwit I guess I've been lucky with my 10/0 so far, I get much better results than I can with my slightly larger brushes...of course the damn thing is 15 years old so who knows? ;)

@ BPI, I've been using the good sable brushes, and I have a pile of clean t-shirt material rags for brush wiping etc. that have been working great so far. You were very correct about the daylight lamp, I got one of those daylight bulbs and it made a huge difference (well, not in how I paint but its much brighter and the colors are crisper and easier to see shades etc.) I've made a wet palette, but haven't gotten to use it yet since I'm not to the blending and shading point yet but, from what I've read about them it'll be better than my little plastic tray.

Next up...more practice minis!
 

gsr15

New member
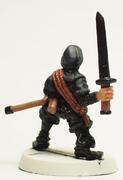
So I've got about a dozen of these old minis from the mid-late 80's that I got years ago as a set for no more than about $1-$2 each, nothing special but I think they'll provide me a good range of stuff to try and learn new techniques on. First up, a ninja and a "paladin" that looks more like a ranger to me.

Only basecoated so far, but any and all critiques are welcome and desired!

Ninja:


So the question on the ninja is because its mostly black...I was thinking of using blue to initially lighten the black before moving on to gray for the upper highlights. I also want to make the sword a very dark metal, would that be best done by using only a thin layer of metallic paint or by mixing in some black with the metal?

Paladin/Ranger:


So I basecoated his neck thing in a brownish color but I really want it to end up a deep yellow...is this a good place to start or am I hosed because of how thin yellow paint is?

Ok, last but not least, still waiting for the primer to dry on this one but its a 1985 Chaos Mage:


I'm posting this one before basecoating because I need some advice on the base colors...my vision of this one is a very deep red robe, with the black tabard. For the helm, I wanted to give it the impression of being on fire...not actual flames, but hopefully blending from red-orange-yellow-white moving up away from the neck. This might be a bit ambitious at my current skill level but I gotta start somewhere. So I was thinking of doing a blue basecoat on the robe since its an opposing color to red, but I don't want to end up with a purple robe. And I really have no idea what color to base the helm. Any suggestions would be greatly appreciated.

Thanks again for looking and happy painting!
 

DunErwit

New member
I also want to make the sword a very dark metal, would that be best done by using only a thin layer of metallic paint or by mixing in some black with the metal?

For very dark metal, perhaps you might try a graphite pen / pencil:

1. Paint the sword with a (very) dark grey. Simply black is too dark and makes the surface look flat.
2. Paint it completely over with the graphite: Rasp the graphite of a (soft) graphite pen into a tray and "paint" it with a brush onto the dark grey surfaces. Re-paint multiple layers depending on how dark or metallic you want the sword to look like. For quite thick, very metallic looking surfaces, just "paint" directly by using a pencil.
3. Finish with highlighting the swords edges either with light grey or a fine and accurate line of graphite (but rather thick this time => best use a pencil).
4. Give the sword's point a small dot of white.

I got this idea from a friend and used it successfully on all iron parts of a catapult.
For lighter and brighter metals certainly not usable, as the graphite is quite dark. But for my taste, it's one of best solutions for dark Non-NMM metals.
 

gsr15

New member
@DunErwit, Thanks for that tip, sounds like that might be what I'm looking for...I assume I do that as the absolutely last thing before sealing the mini? Or is there some other way to keep it on there?

Ok, so I am apparently a VERY slow painter...I think I've spent about 3 hours working on this ninja's clothing and I'm still not satisfied, it keeps looking far too bright and unnatural so I end up going over the whole thing with a black glaze to bring down the highlights but then it looks like there's no shading happening so I highlight again then rinse and repeat ad infinitum it seems. I also clearly need to work on my smoothness and paint control, as the camera so effectively points out. Here's what it looks like now after the latest round of dulling (forgive the image quality):


Also started a little work on the hands and face, but still need a lot of cleanup and such.

Thanks for looking, C&C always welcome, I want to get better!
 

SkelettetS

New member
black is a pretty hard colour to get right, as said too much highlight and it looks grey, too little and it looks like there's no shades. guess you really can go nuts on it. i usually involve some different colours when painting black, prefferably some blue-ish tones. it all makes it a little more diffiult though, maybe baby-steps is the way to go :D
cute little ninja by the way :) and dont worry about the pictures, although a bit small ive seen worse (just take a look in my thread... sigh :D )
 

DunErwit

New member
@DunErwit, Thanks for that tip, sounds like that might be what I'm looking for...I assume I do that as the absolutely last thing before sealing the mini? Or is there some other way to keep it on there?

Hope, my reply isn't too late :)

I must admit: I do not use any sealing, because even the mattest varnish I have makes my minis look a bit shiny or even semi gloss... But as I paint my minis only for sceneries, it's not a problem, since I do not have to touch them any more as soon as they have been glued to the base (with the aid of some gloves).
Of course: If you are using your minis for tabletop playing or the like, you will need a sealing, not at least for the graphite. But you have to experiment a bit whether it works and keeps the effect, or not.

Sorry for not being able to help you more with that...
 

gsr15

New member
@SkelettetS I started my shading mix with blue and then moved on to white, but I think with the number of times I've redone this its probably obliterated any trace of the blue...do you think a dark blue wash would balance things out at all? Oh, and the thumbnails are clickable links to full size photos...is it preferable around here to insert the pictures directly instead? Thanks!

@ DunErwit Thanks for replying, period! I'm not doing any gaming, just like painting and trying to learn how to do it better, so I guess you're right that I can probably get away without sealing them...just a habit from back in the day (though it always did slightly change the look of the mini.)

So here we go...I've spent another gajillion hours slaving away on this only to take pictures and once again see how sloppy things look, I think I need to invest in one of those head mounted binocular magnifier things. I've done some more work on the clothing, put a few more layers on the rope, did the eyes (only slightly less googly than the first attempt, but better is better I guess), and started adding some of the metallics. I need to retouch the sword a bit more to lighten the black and smooth out the rippled edge (which is intentional...going for that authentic Japanese katana look) in prep for the graphite treatment suggested by DunErwit. Any thoughts for improvement would be welcomed!


Thanks for looking!
 

SkelettetS

New member
well look at that, you actually could klick the little ninjas, totally missed that one! :)

blue wash was not what i had in mind really, with washes most of the pigments end up where it should be darkest (black). you can use dark blue more of a first highligt, instead of using dark grey, sort of. the best way (imo!) is to glace blue paint on after you highlighted the mini black->grey->white so it just get a little colourvariation.
 

gsr15

New member
Ok, I've gotten about fed up with this ninja so I'm calling it done and finally moving on to something else. I had a lot of trouble figuring out how to shade/highlight all those many little folds in the fabric, plus the black never did come out quite how I wanted it too. The graphite treatment I did on the sword (as suggested by DunErwit) actually worked pretty well, it just didn't photo well...in the pics it looks just like the silver paint I used on the other metals but in reality you can definitely see the difference. I need to experiment with different base colors for it though, as I think it could look better.

So on a whim, I searched the CMON gallery for ninjas to see what I could find and I came across this:http://coolminiornot.com/188960 ,which ultimately led me to the discovery that the dozen miniatures I have that are now my learning/practice pieces are originally the Dungeonquest:Heroes set, so I've now got the names for all the characters.

That being said, here's my final attempt at Tori-Jima, Ninja:

View attachment 2926View attachment 2927View attachment 2931View attachment 2928View attachment 2930

Thanks for looking, any tips or suggestions for what I could have done better would be greatly appreciated!
 

Tercha

New member
The eyes are getting better!
The base stands out as needing doing, and the name - print out his name and cut it out to make a better name plate...(just print in several different size fonts - cut it out and glue to the base with PVA - cheap and will look heaps better)
 

gsr15

New member
Thanks Tercha, I think I'm going to invest in one of those head mounted magnifying visors...might be easier to do if I can actually see what I'm working on clearly! I haven't bothered with basing since I'm still trying to improve my painting to a better level...didn't see the point in spending any time on a nicer base if the painting doesn't fit. About the printed name label for the base...do you use transparency film or just regular paper?
 

Tercha

New member
I would just use decent regular paper.
The head magnifiers are good (IMO) as I get older my eyes are getting worse!
 
Back To Top
Top