O.K so someone asked me to write a little bit about my spray booth. I didn’t take any progress shots of it, as I didn’t think anyone would be interested so you’ll just have to use your imaginations…

Things I used:
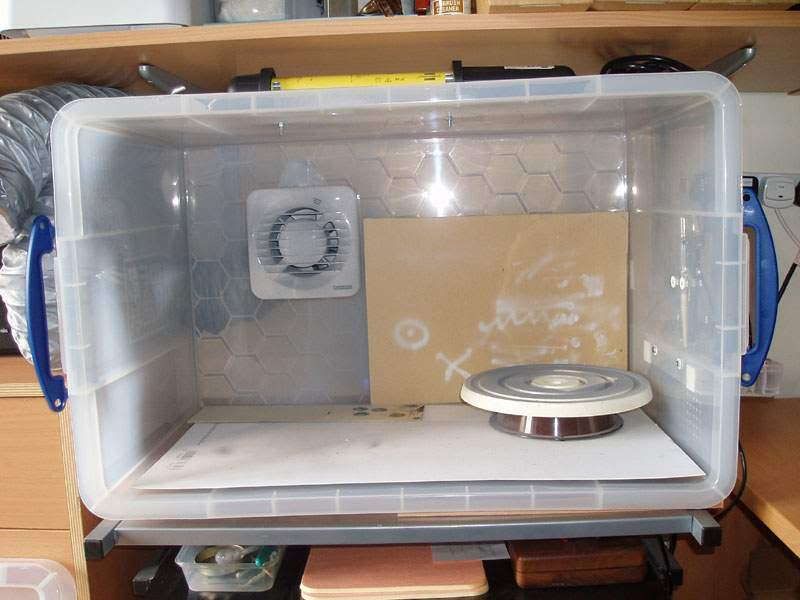
· 1 Plastic box (I used an 84 litre ‘Really useful box’ because I wanted a box big enough to work in and use as a drying booth. The internal dimensions are 605 x 370 x 355). £20 from Staples Some other shops more then doubles the price of these boxes. The advantage of these boxes is they are almost perfectly square and the lid comes completely off. They are also clear so allow lots of light in.
· Extractor fan. I used a cheap bathroom fan from B&Q (£15). I read on one website about getting a non-sparking fan as some have a brush which causes a small spark on the fan which could cause some gases to explode, although the quantities of paint from the brush should make this unlikely.
· Length of ducting for the fan, I have no idea how much this is as I had some.
· Nuts and bolts to hold everything in place.
· Tool clips to hold the light and airbrushes (see photos).
· Light. I bought an insulated work light from Makro for £10. It’s very bright, almost daylight quality.
· Flex and plug. For the fan I bought it uses 2 core flex and the plug has a switch built onto the back (or you could cut a switch into the flex).
· Also something to act as legs just to raise the box up slightly so the top can be taken on and off.
So first I wired the fan up with the flex and plug to check it all worked, as it should. I then cut an approximate 4’’ hole into the back of the box for the fan to fit through and bolted it in place. The fan is slightly off centre to the painting position so when I am painting dust is not being dragged across the model. I then secured the ducting with tie wraps and duct tape. 2 tool clips were attached to the top of the box to hold the light on the outside, the light can then just be clipped off if I needed to move it. Small pieces of wood were placed under the box to act as legs, this also aids in taking the lid on and off. And that’s about it for the basic box, while painting the fan draws fumes away and once finished the lid can be put back on and the fan left on. With the lid on it makes a relatively dust free environment for drying too.
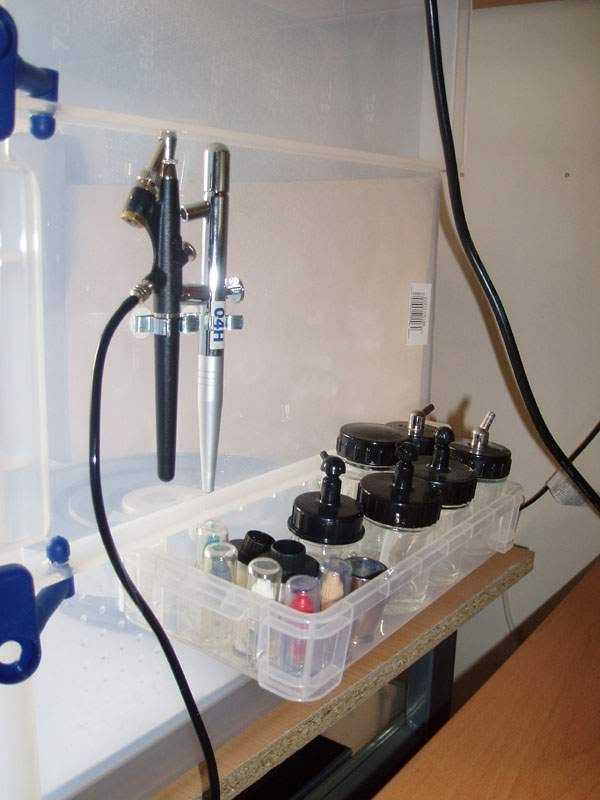
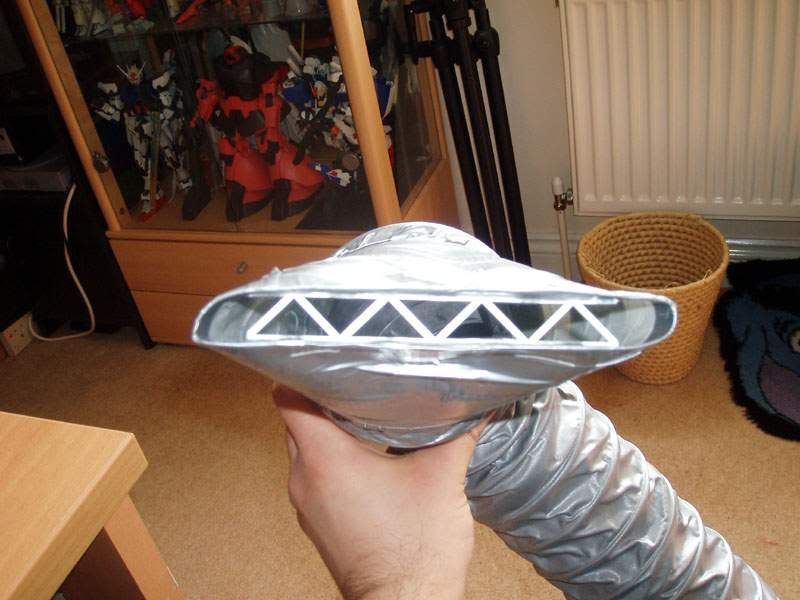
I decided to add a couple of other features I thought would make working and storage easier. Attached to the side is a smaller (pencil case sized) Really useful box to store the airbrush pots and nozzles (I use an Aztek as my main brush). This is simply bolted to the side. And also 2 small tool clips to hold my other 2 airbrushes. The other thing I added was an attachment for the ducting this was simply made from an empty drinks bottle (coated in duct tape to make it more durable) I flattened one end down and secured it to a styrene girder. The point of this is so the window doesn’t have to be open as far (less then 1’’) to allow the ducting out, thus cutting down on the cold air. A piece of filter material can be placed over the end.


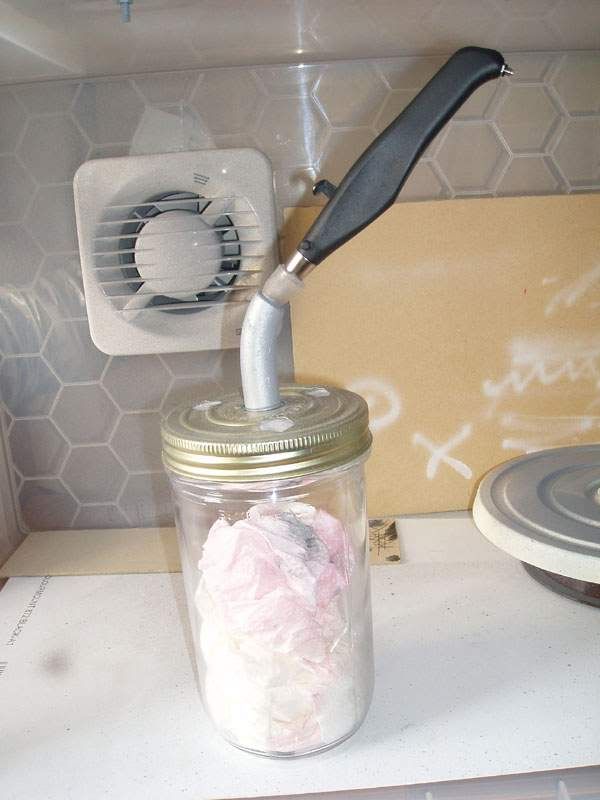
I thought while I was writing this I would also show you all my homemade airbrush cleaning station. This is a glass jar with a metal tube screwed through the top with a rubber end on it (to protect the airbrush and create an airtight seal). Holes were drilled into the lid to let air out and a filter is held into the lid.

That’s about it I hope that all made sense… probably not but there is more pics on my flickr page under workshop which will hopefully make things more clear, and any questions please ask.
http://www.flickr.com/photos/ronin412/sets/
And please be kind I\'ve not posted anything like this before :redface:

Things I used:
· 1 Plastic box (I used an 84 litre ‘Really useful box’ because I wanted a box big enough to work in and use as a drying booth. The internal dimensions are 605 x 370 x 355). £20 from Staples Some other shops more then doubles the price of these boxes. The advantage of these boxes is they are almost perfectly square and the lid comes completely off. They are also clear so allow lots of light in.
· Extractor fan. I used a cheap bathroom fan from B&Q (£15). I read on one website about getting a non-sparking fan as some have a brush which causes a small spark on the fan which could cause some gases to explode, although the quantities of paint from the brush should make this unlikely.
· Length of ducting for the fan, I have no idea how much this is as I had some.
· Nuts and bolts to hold everything in place.
· Tool clips to hold the light and airbrushes (see photos).
· Light. I bought an insulated work light from Makro for £10. It’s very bright, almost daylight quality.
· Flex and plug. For the fan I bought it uses 2 core flex and the plug has a switch built onto the back (or you could cut a switch into the flex).
· Also something to act as legs just to raise the box up slightly so the top can be taken on and off.
So first I wired the fan up with the flex and plug to check it all worked, as it should. I then cut an approximate 4’’ hole into the back of the box for the fan to fit through and bolted it in place. The fan is slightly off centre to the painting position so when I am painting dust is not being dragged across the model. I then secured the ducting with tie wraps and duct tape. 2 tool clips were attached to the top of the box to hold the light on the outside, the light can then just be clipped off if I needed to move it. Small pieces of wood were placed under the box to act as legs, this also aids in taking the lid on and off. And that’s about it for the basic box, while painting the fan draws fumes away and once finished the lid can be put back on and the fan left on. With the lid on it makes a relatively dust free environment for drying too.
I decided to add a couple of other features I thought would make working and storage easier. Attached to the side is a smaller (pencil case sized) Really useful box to store the airbrush pots and nozzles (I use an Aztek as my main brush). This is simply bolted to the side. And also 2 small tool clips to hold my other 2 airbrushes. The other thing I added was an attachment for the ducting this was simply made from an empty drinks bottle (coated in duct tape to make it more durable) I flattened one end down and secured it to a styrene girder. The point of this is so the window doesn’t have to be open as far (less then 1’’) to allow the ducting out, thus cutting down on the cold air. A piece of filter material can be placed over the end.


I thought while I was writing this I would also show you all my homemade airbrush cleaning station. This is a glass jar with a metal tube screwed through the top with a rubber end on it (to protect the airbrush and create an airtight seal). Holes were drilled into the lid to let air out and a filter is held into the lid.

That’s about it I hope that all made sense… probably not but there is more pics on my flickr page under workshop which will hopefully make things more clear, and any questions please ask.
http://www.flickr.com/photos/ronin412/sets/
And please be kind I\'ve not posted anything like this before :redface:


