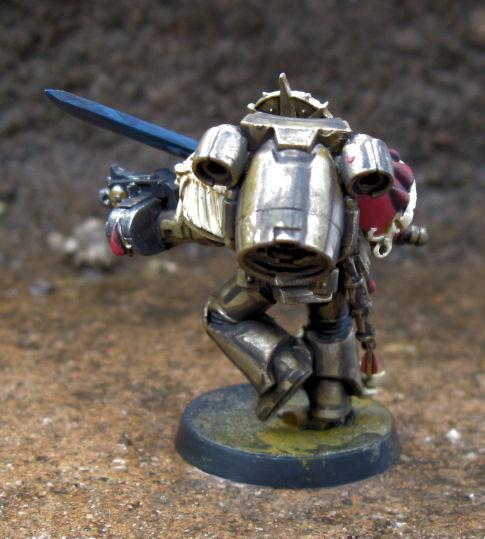
Gold: Experimenting with true metallic

Dryad

New member
I'm looking for some serious feedback/criticism on this model.
View attachment 6152View attachment 6153View attachment 6154
My metals up til now have been a little basic so I'm trying to take it to the next level without biting off more than I can chew. I'm shy of doing NMM cos I don't like the stone/ochre/yellow effect when its not done perfectly. I get about 6 hours max painting time a week (I'm a mum with 2 small kids) so I don't really have the to time to perfect that the way I would like to. So I've decided I'll just try and improve my metallics for now.
Here's a rough run down of what I did;
These are painted with a thinned layer of Bright gold(coat d'arms) over snakebite leather. I mixed on a wash (for me about 70% water with a couple of drops of glaze medium) of scorched brown with a tiny dab of dark angels green and applied it all over (not too heavily). I then blocked in all the other colours before continuing the gold. I thinned some black (50/50 with water and a drop or two of glaze medium) and applied in into the cracks. Then I started the shading with a glaze of about 50/50 brown and black. Then I applied some highlights with a silver(VMC) and gold mix. Did the gemstones and power sword. Wings are still wip so haven't stuck them on yet.
At this point I'm calling the gold finished, but I'd really appreciate some feedback/suggestions on what I could do better.
 

Chrome

New member
I must ask, what happened between
217671_md-Blood%20Angels%2C%20Gold%2C%20Sanguinary%20Guard%2C%20Warhammer%2040%2C000%2C%20Work%20In%20Progress.jpg

over att dakka and the new pic?
attachment.php


The back of that jump pack is awesome in the first pic but looks blotchy and hasted in the second.

If you're going for a gritty and dirty gold then I'd say you've got it already but if you're looking for something more polished I'd add a few more layers of pure gold to it all...
 

Dryad

New member
Thank for the reply chrome. In truth I find it quite difficult to take accurate photos the contrast between the before and after is stronger in reality. (The new pics are on dakka too) As you can see these were taken outside so there is a bit of bleaching in them. Yes, there is a blotch in the middle I'll have to tidy up.
 

Chrome

New member
Thank for the reply chrome. In truth I find it quite difficult to take accurate photos the contrast between the before and after is stronger in reality. (The new pics are on dakka too) As you can see these were taken outside so there is a bit of bleaching in them. Yes, there is a blotch in the middle I'll have to tidy up.

take that blotch and try to mimic the effect in the first pic then, because that really does look like a perfect reflection. :)
 

Chrome

New member
Much, much better! :)

Going back with the gold after the glaze is great, you can still keep the gold/silver mix but use it as extreme highlights on the edges. :)
 

Dryad

New member
Thanks I will try that. I think I had it a bit too thin as well. (I'm a bit new to using a wet palatte- I find it great but I think I'm still compensating for the paint drying out on a normal one) Quick question. I've tried to do a more olive-gold look cos I feel that is a more natural look than a lot of the more yellowy-orangey painted golds. To me it looks pretty accurate on the colour tone but I'm wondering if I've overdone the muted colour thing though as a couple over on dakka seem to think it doesn't look gold.
 

Meph

Cat-herder Extraordinaire
Well, gold comes in many colours ey, it does tend to look a bit like a middle between regular 'yellow' gold and the more fancy white gold. But whatever name you slap on that colour, it does look pretty awesome. Nice technique, I must say.
 

Dryad

New member
More progress, I've done the gold on the rest of the squad. I think the last couple of guys came out marginally better as I was getting the hang of it. I think I'll add a few touches of silver but keep it very restricted like spot highlights. Will post again when I've got them finished. I took this pic inside so its a bit dark, but I used some trace paper in front of the desk lamps which has fixed the bleaching/glare problem.
View attachment 6177
 

INFERNO

New member
Altho it looks nice i think that You are doing one thing wrong (please dont take me as a rude person, i just want to help). Actualy You are trying to mimic NMM way of painting reflections. While its good for nmm (cause You are painting with flat colors) its not that good for true metallics. Unfortunately my language skill doesn't let me explain it as clearly as i would like to but I will try my best.

First of all: What this guy is talking about?

Look at the leg of the first mini u posted, take it (from foot to knee) as a one surface... There are some almost black areas in the middle of the flat surface. In NMM it's a good move to emphasize the shining of the surface (by creating lot of contrasts). Doing same with metalic paint will do meny little surfaces having its own shine separated by some random black areas

Second thing: What's your solution doc' ?

Paint whole metallic surfaces with metallic paint (wohho! what a genious i am!). Then shade it using "zenithal light" method. So shade the part that is facing ground and the part under his hips. Keep your deepest shades almost without metallic shine. And then place your brightest highlight over the upper edge of the armor. U can also highlight upper part of non shaded surface (between "hips" shade, and "ground" shade)

I hope u can understand my broken english.

^INFERNO
 

Dryad

New member
Thanks for the comments guys. Some good food for thought there INFERNO. I freely admit to doing a half-way house here trying to copy the NMM way of painting but using a metallic basecoat. I wanted to see how it would work with metallics because I've had poor success in the past getting contrast with them. What would you shade with? I have seen some nice zenithal light work done. So I guess I could try that out in the future. Looks like I'll have to find some more models to practice this on.
 

INFERNO

New member
TBH u dont have to care or know much about "Zenithal" light... just try to place shadows where do u feel they should be. Best way is to place your mini uner the lamp, take a photo and adiust contrast in PS/gimp etc. And u have great example of highlights u should try to copy. (dont forget that u cant go over the top with it, as a lamp is much more "heavy" light source for the mini then the sun for a normal person and will create some faults in overal lightning).

For shading metallic paints u should use normal flat paints- all sort of reds/violets/purples/browns/greens/blues (altho this one is tricky)/yellows and Black. Just pick up what do u feel should looks good. Just remember to thin it to the consystency of wash and aply thin layers
 

Dryad

New member
What is a good size? I tend to worry about the pics being too big. It is scaled down to 40 percent so I can change it to full size.
 

Torn blue sky

New member
Deffo needs bigger pics , a bit more light too. As it stands no one could really vote it above table top, because they can't *see* anything ;) Holding off voting till you get it sorted out =)
 
Back To Top
Top