Basic Bases

-Ice

New member
Hey guys! The time has finally come for me to venture into bases. I've got a couple of space marines who were "sacrificed" to practice and so I can practice on basing with these. Nothing fancy, the goal is just basic bases that I see on codexes (codices?) and such.

So, what do I know about basing so far?
1. Local GW guys put the sand on the base before priming, they say it "locks" the sand to the base. I never understood that until now.
2. You can paint the base first, then glue on the sand/grass. This is good if you don't plan to coat the entire base with sand/grass (therefore some of the plastic base will show through)
3. You can apply the sand first, then coat them with paint
4. Most common technique advised (at least on the GW site) is drybrush/overbrush

A few questions to start off then:
a. How would you "lock" the sand if you didn't prime it with the mini? I'm currently trying this by applying a layer of watered-down PVC glue over the sand, but it's taking ages to dry so I am not sure if this is a success.
b. Any other techniques aside from drybrush/overbrush?
c. How do you get the grass to stand up? I think I read somewhere that you tap the base a certain way but I can't find that site/page/video now
d. The GW modelling sand seems too... fine. The rocks I see on pics seem to be bigger. Is that different sand or has the rocks just "settled" on my box?

Thanks guys! Yes, I'm probably over-analyzing this again, as Tommie would always say.
 

gohkm

New member
Let's see:

a. To 'lock' the sand to the base, essentially you are using an adhesive to bind granular particles. Any sort of adhesive will do. I use PVC glue. If it's taking way too long to dry, you might be diluting it too much. I've also seen a really thick, undiluted gloop of black paint, over which the sand is sprinkled and tamped down - far too messy for me, and I'm not sure if the adhesion is all that great. Generally, though, and I say this with great trepidation, sand dumped over a PVC glue pool is great, plus when you prime, paint, and seal after that, it goes nowhere. Just need a bit of patience.

b. Paint and wash as per standard. Drybrush/overbrush is a standard technique since the sand grains provide great texture that takes very well to drybrushing.

c. Sprinkle on your static grass, turn the base upside down, and knock it a few times to get rid of the excess. Turn it right side up, then gently blow on it. The static created by the grass strands rubbing against each other is usually enough to get them to stand up a bit more. If that's not enough for you, maybe a plastic comb through your hair and using that to artificially charge the grass ...

d. Sand is sand. Just go pick up some sand at the beach and bake that in the oven for a bit to dry it out. Small rocks and pebbles also go great on bases as boulders and the like. If you think the sand has clumped in the box, just shake it out vigorously for a while and see if that helps. The GW sand probably seems too fine because it's probably been sifted. Or get some Vallejo Sandy Paste - I find the grains ultra-fine, but at 28mm scale, it looks good. Occassionally, I toss in bits of beach sand just to break up the uniformity.
 

HeavyBolter

New member
I use Zap CA super glue for Basing. Mine is a two step process. Gluing the sand down using Zap Gap filling( the green bottle) spreading it around the base with a toothpick. Dip it in the tub of sand and shake off the excess. I then use Zap CA Thin Glue to seal the sand. This is the tricky part as Thin CA flows quickly and can get messy fast. I use the fine point bottle nozzle to drop one or two drops of Thin CA onto the sand, the capillary action lets spread to all the sand grains. It dries fast and seals tight. Sometimes I'll paint the sand ( Scorched brown , Drybrush Beasty Brown, then bleached bone or khaki) or use Brown Ink, then dry brush. They both work.

I apply grass by putting a spot of Zap gap and shaping it with a toothpick then sprinkling a pinch of grass onto that spot then flip and blow.

I stopped using pva because I hated waiting for it to dry.
 

-Ice

New member
Ah yes, some glue then sand is okay if you prime it afterwards, but my question was more for "locking" the sand in if you already have a painted mini glued on to the base --- therefore priming the base is no longer possible.

I've taken a few pics of my work, I am quite happy with the result. Again, the "unexpected" just rattled me a bit - the glue (undiluted!) took too long to dry, the paint took too long to show (overbrushing worked wonders!), blah blah blah. With the finished product in front of me, I have a bit more confidence now.

Now I have to try the grass trick.
 

-Ice

New member
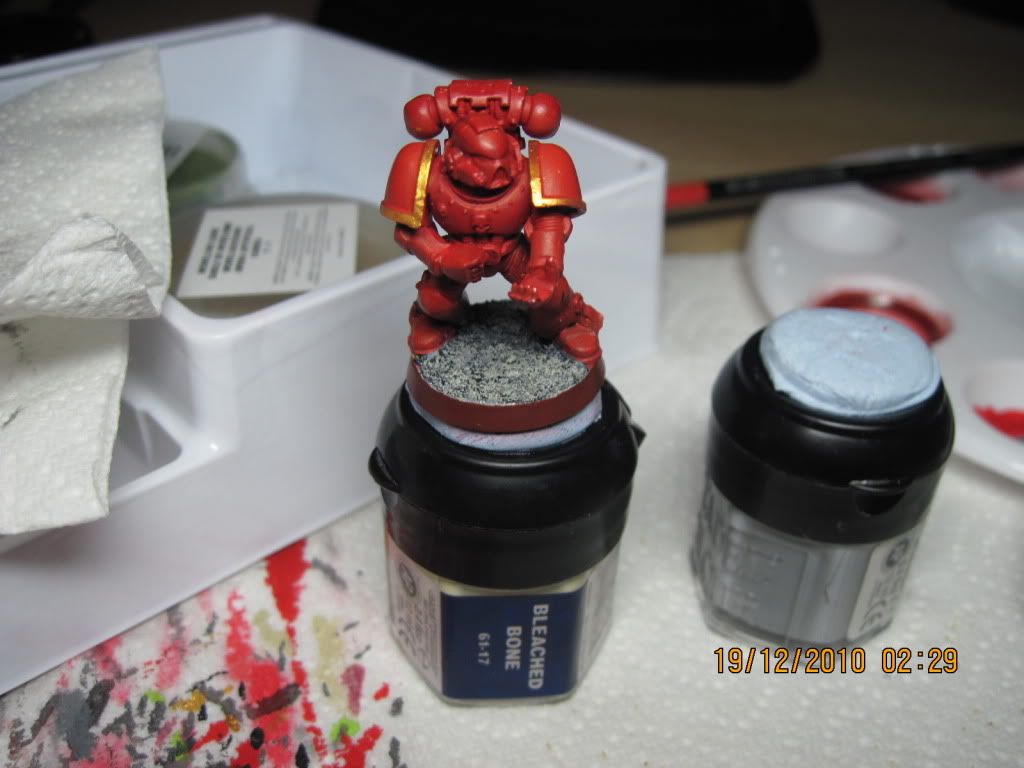
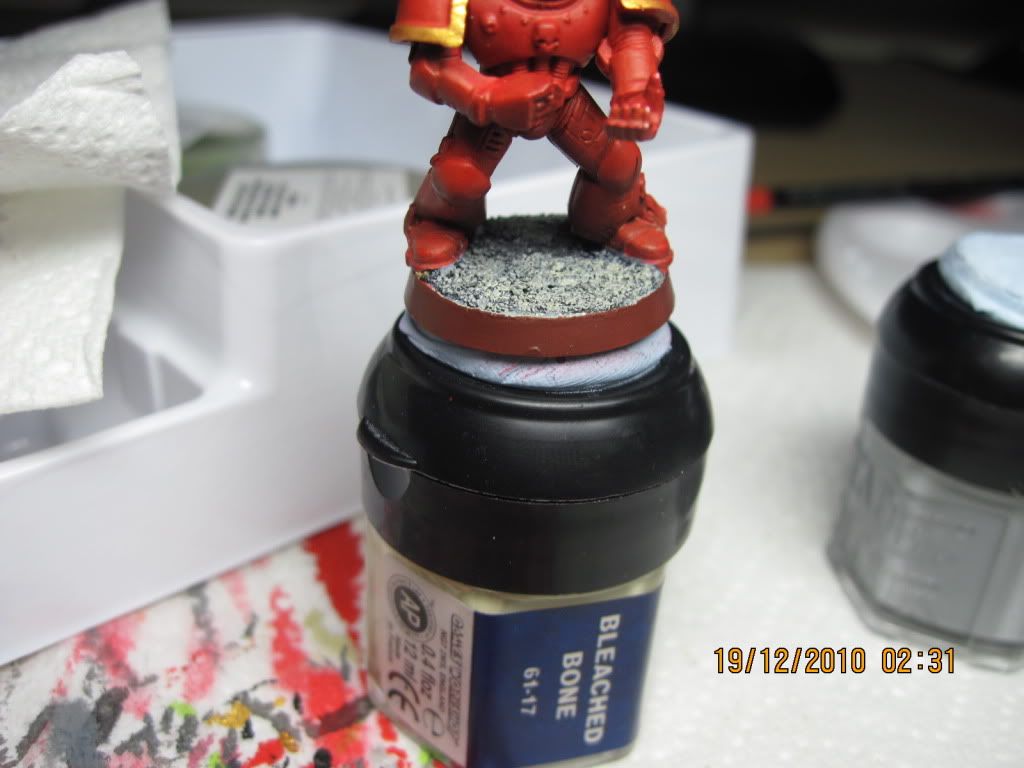
Here is a picture of my basic base:
Painting4021.jpg


Painting4028.jpg


For some reason, a bit of the sand from directly under the mini has come loose, but that happened before I applied a thin layer of PVC "wash". Apparently, a layer of paint alone is not enough to "lock" the sand.

I've tried the grass trick and I must say, it worked out perfectly! Awesome! If only things went this smoothly!!
Pictures of the final base to follow --- need to charge the camera batteries for now.
 

HeavyBolter

New member
but my question was more for "locking" the sand in if you already have a painted mini glued on to the base
I understood your question and I clearly explained my method to "LOCK" the sand after its been glued on and not primed. This way works for me as I always base last after the mini is done unless I'm doing a special base( slate,cork..whatever)
drop one or two drops of Thin CA onto the sand, the capillary action lets spread to all the sand grains. It dries fast and seals tight
 

-Ice

New member
Sorry about that HB! I was replying to gohkm's post and only saw your post afterwards. I do have some CA glue from GW that says "thin" on it... I'll see how that works.
 

Wicksy

New member
I just paint the base brown, then a thin layer of sand dip. Then diluted brown is plonked on after the glue is fry and that fixes it in place.
 

Mourner

New member
For TTQ minis, i usualy glue some pieces of treebark* to a base.
Followed by a coat of diluted woodglue (i think about 2:1, glue:water) the treebark is left clean of glue.
Place the base in a small box to catch excess sand, and bury the base in sand.
Leave to dry for a while, just do something else and come back when you're done.
Brush off the loose sand.
Prime and paint as you like.

I always drybrush natural materials like sand, rocks and trees.
there's so much small, random detail in these that it's impractical to paint otherwise.

I've never gotten the hang of static grass, so i don't really use it.
but i'll be keeping an eye on this thread to see if i can learn.

Keep the questions coming :p
Mourner

*treebark makes great, cheap rocks, easy to cut, just let them dry.
I collect mine at a children's playground nearby.
they're easy to work and looked almost perfectly scaled
 

Mercius

New member
I put down a layer of pure PVA glue on the base and then sprinkle my sand of choice into the base. Once the PVA is dry, I take a watered down PVA mix and coat it over the top of the sand to "lock it" onto the base even further. This helps prevent the sand from being scraped off when you are painting/dry-brushing it later to highlight it. Once the sand it completely dry and painted then add PVA glue in the shape and location you want your grass and then sprinkle some static grass on top of the PVA glue, tap the bottom to knock the excess offf, then gently blow on it to "charge" it and make it stand up.

If you want something extra in the future you can add some rubble or old road, etc, you can use cork board and pick off little pieces of it. Cork makes a very effective looking rubble type rock, and can also be used for larger rock formations to stand your minis on top of.
 

-Ice

New member
Surprisingly, my first go at static grass was a success. I used the GW cutters to "pinch" a few grass, dump it on where my glue was, flip the mini over, give a few taps, and when I turn the mini back upright, the grass is standing already, but I still blow on it a bit to "coax" the few stragglers upright.

Looking at my first finished base now, it looks awesome. Funny how ugly it looked during the process. Still think it could use a bit of variation on the grain size, but overall, I'm okay with it.
 

HeavyBolter

New member
Find a model railroad store that carries Woodland Scenic Ballast(another word for sand). It is basically a huge tub of sand in various grades of grain size. I also found the GW sand to be too big and definitely too rocky. I sifted out all the rocks and re-added about a third of them. I mixed in a 50:50 ratio the gw sand along with a fine grade ballast to create variable grain sizes.
 

-Ice

New member
Thanks HB! I think I saw a store that sells trains and scenery and RC cars, I'll see if they have any sand.
 

nels0nmac

New member
If you want to have some variation of grass clumps that are sooooo easy to use try a search for Silfor. They produce sheets of ready made clumps of varying colours and sizes. You just pick them off the sheet, a blob of PVA on the bottom, place them on the base and that's it. Simples

In the UK you can get them from Internationalmodels.com -:http://www.internationalmodels.net/acatalog/Grass_Tufs__Strips.html

They are more expensive there than other places and I have been told where to go but, to be honest I really can't remember as it has been so long since I last bought any. Not because I don't use it, more that you get so many clumps on a sheet that they last quite well. Most of the pics in my gallery have got these clumps fixed to the bases.
 

Shellshock

New member
Those silfor ones are awesome, I have a couple of packs and they are 110% a cut above anything much else available, very easy to use and yeah you get a ton per strip, lasts a long time.
 
Back To Top
Top